Day 30 Jewelry Tool Modification

As I was working on the last project, I was reminded of something I usually do, but forgot in this instance, and it “bit” me…… Let me explain:

Screw Mandrel Header

If you have ever gotten new “Screw Mandrels“, it is a happy day and there are so many tools that can be used on them, they are great! But today I will show you a quick tip that might save you some time, actually WILL save you some time someday.

If you look at the end of the screw mandrel, or the “screw” portion, you will probably notice there are some sharp edges and small “burs” on the screw. Now this isn’t a problem until this end comes in contact with the piece of jewelry you are working on while spinning. This will usually leave some pretty good marks if you are lucky, and take small chunks out of your beloved piece of jewelry if you aren’t so lucky.

Screw Mandrel (1) Screw Mandrel (2)

Here is the cure:

I have mentioned before the fact I hate to throw away old burs and such, well the same goes with old files. Take an old Hand File and while the screw mandrel is in your Foredom, rub the end on your file (#4 in this case) cleaning the burs off and rounding the edges of the screw.

Screw Mandrel (3) Screw Mandrel (4)

Now take a small piece of 600 Grit Sandpaper and hold it to the screw end while spinning in your foredom. This will polish it a little more.

Screw Mandrel (5) Screw Mandrel (6)

Now if you….. I mean WHEN you accidently touch the spinning end to your jewelry, it won’t tear it up so badly. It will still leave a little mark, but more manageable.

Screw Mandrel (7) Screw Mandrel (8)

Hope this helps.

Now enjoy your day and make something awesome!

Doug

Day 29 Channel Setting and Marquise Setting

Ok, late but still on schedule to post every day for the first 90 days.

I started this pendant project a couple of days ago, we went through a couple of lessons, and today we are going to channel set the stones, bezel set the marquise stone, and final polish it and make it “purty”. I was going to break this up into 2 more lessons, but I figured…..Why wait!

Channel Setting (34)bChannel Setting (33)

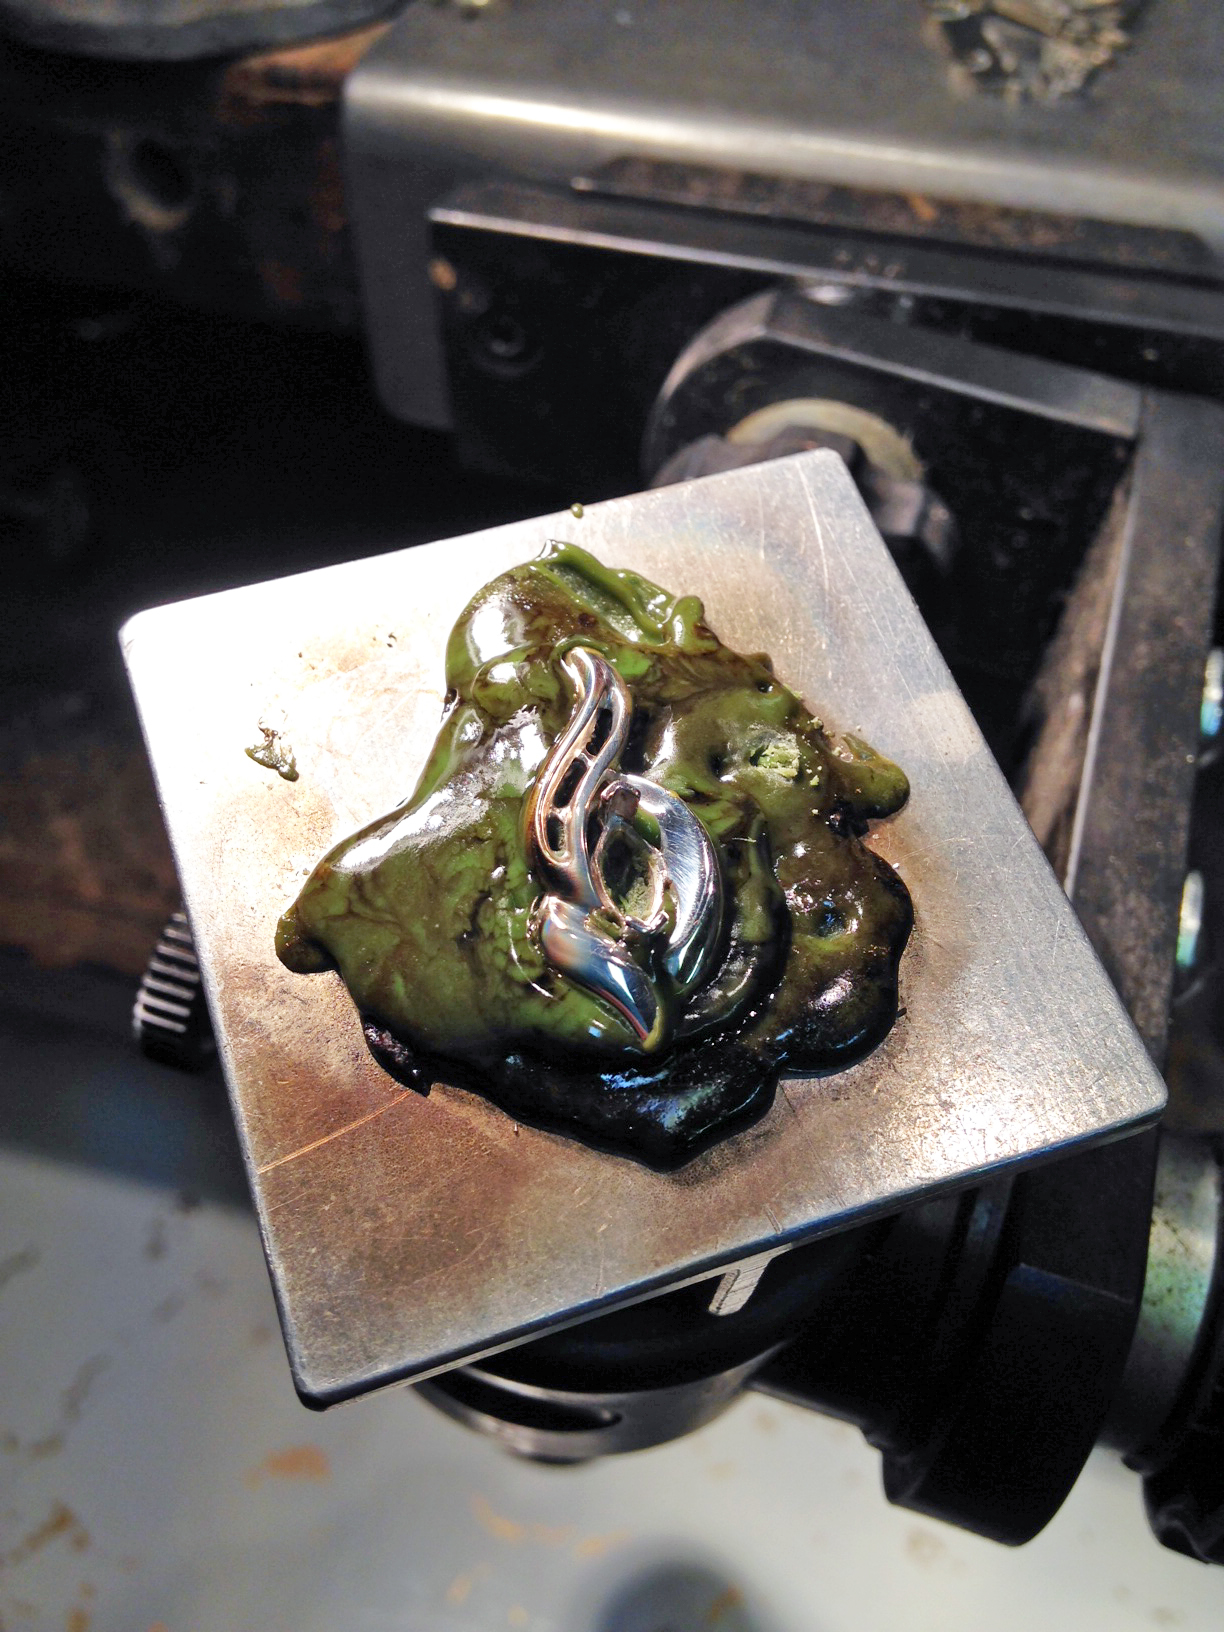
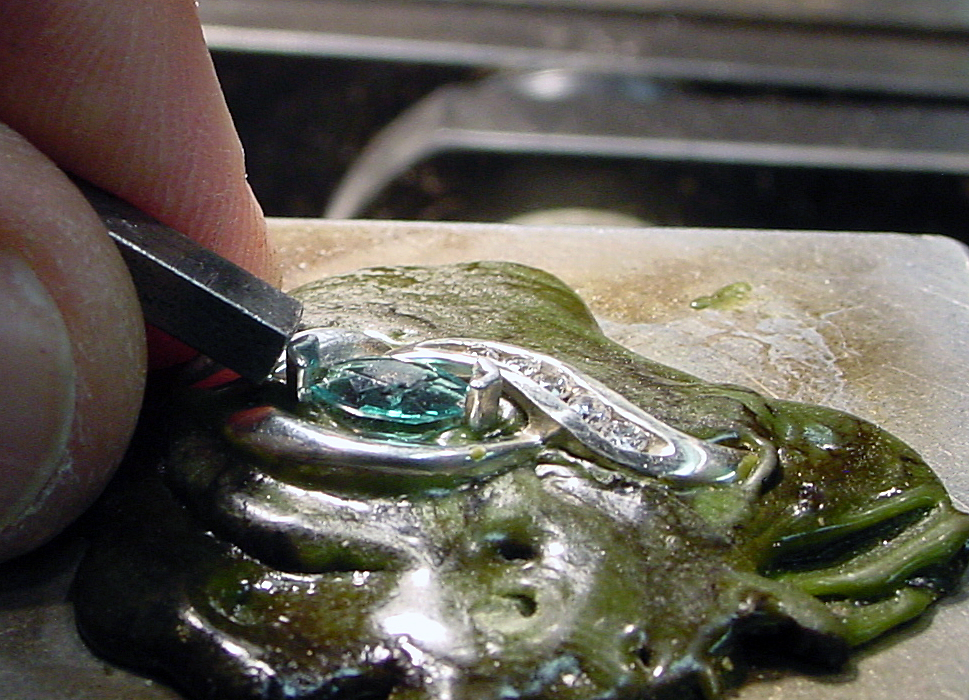
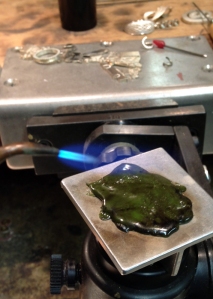
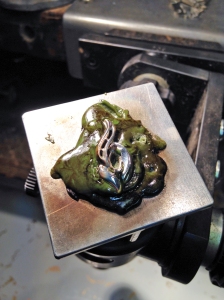
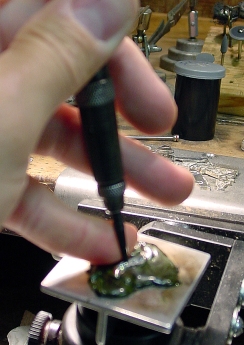
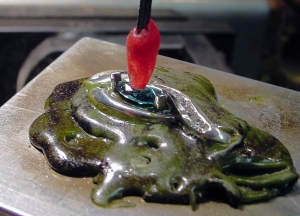
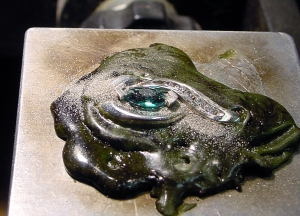
The first thing I do is mount the pendant in “Dop Wax“. I heat up the dop wax carefully with my Smith Mini Torch, just enough that the top couple of millimeters is soft. I also warm up the pendant with the torch and place it on the wax, taking care that it doesn’t sink too far into the wax. I want the underside supported, but I don’t want the wax to cover the channel or fill the inside of the channel. If it does fill the inside of the channel, you can push it out of the way with a small pointed tool while it is still marm.

Channel Setting (1) Channel Setting (2)

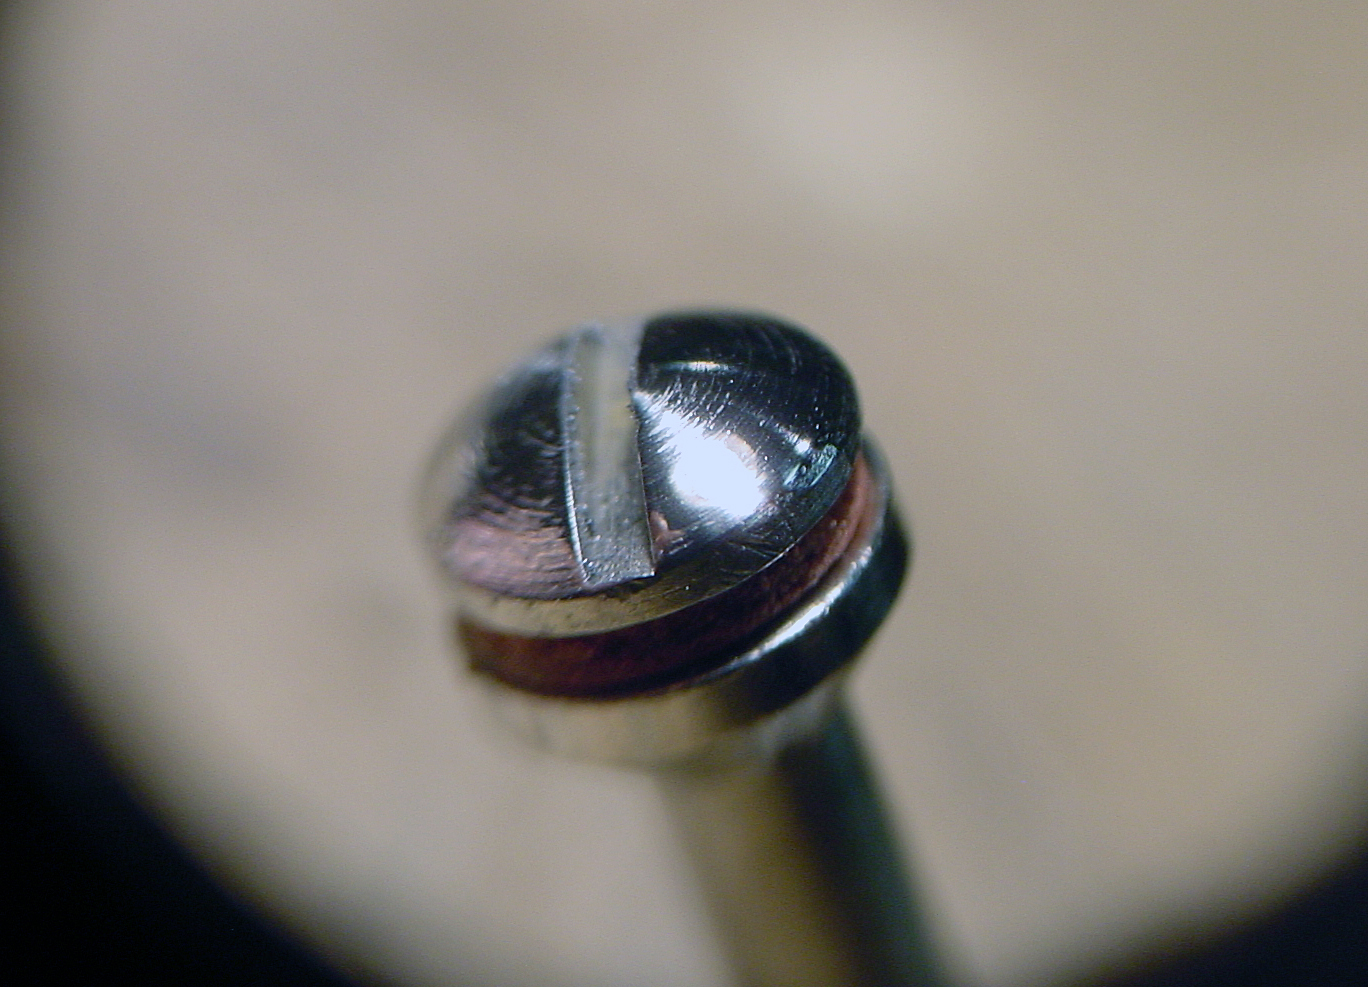
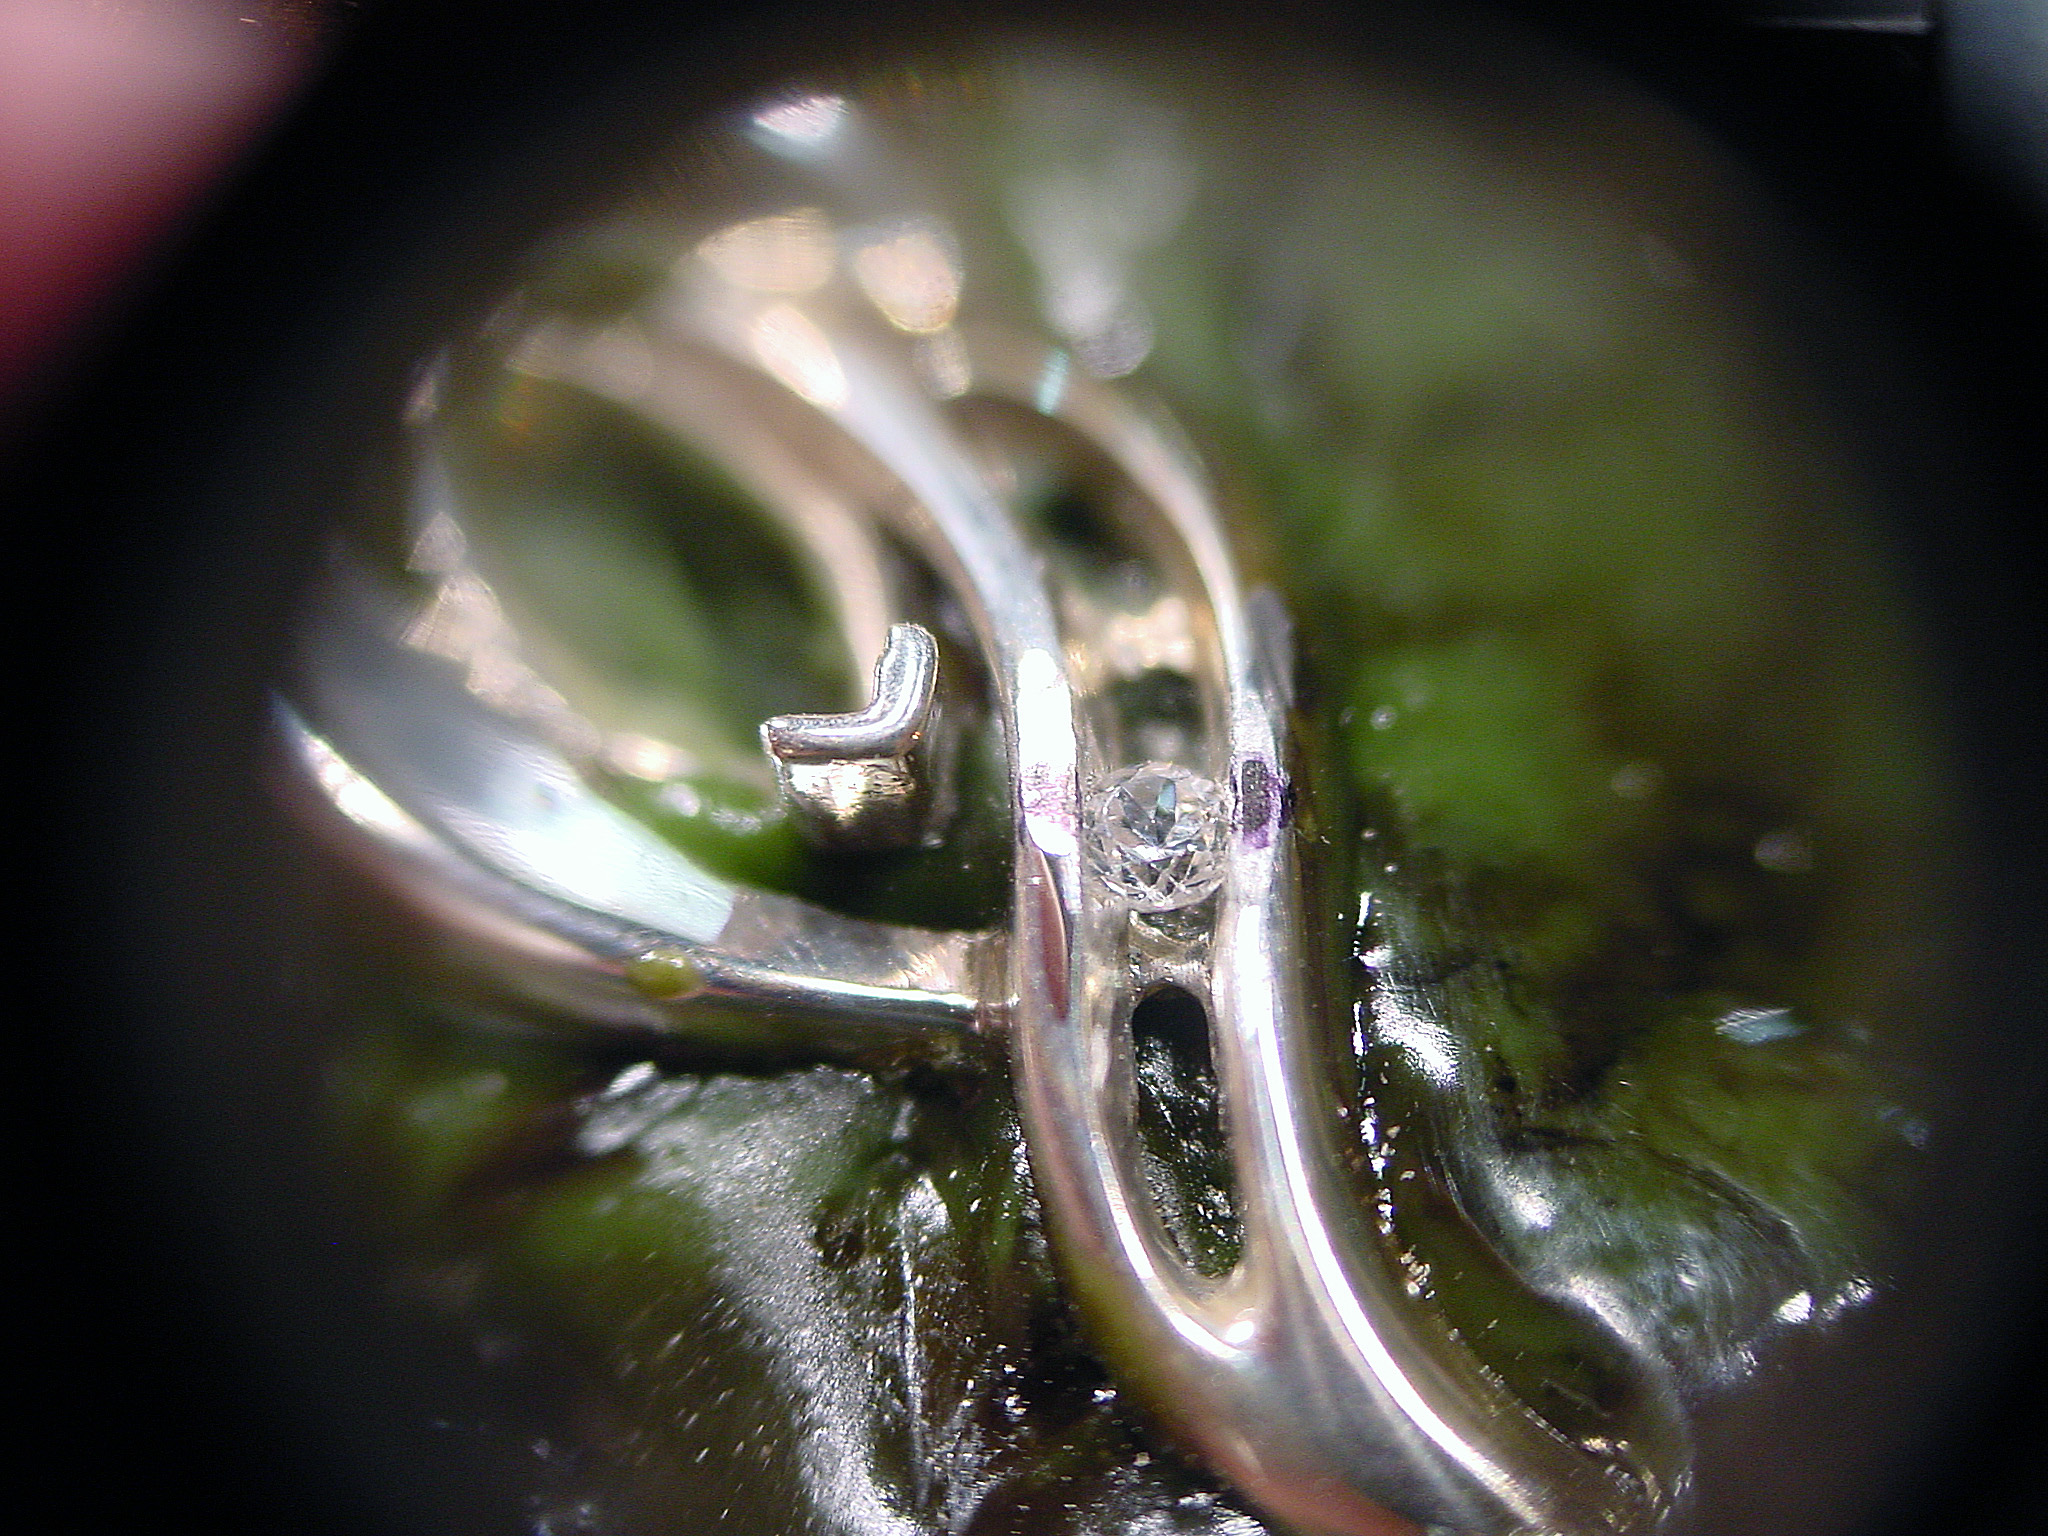
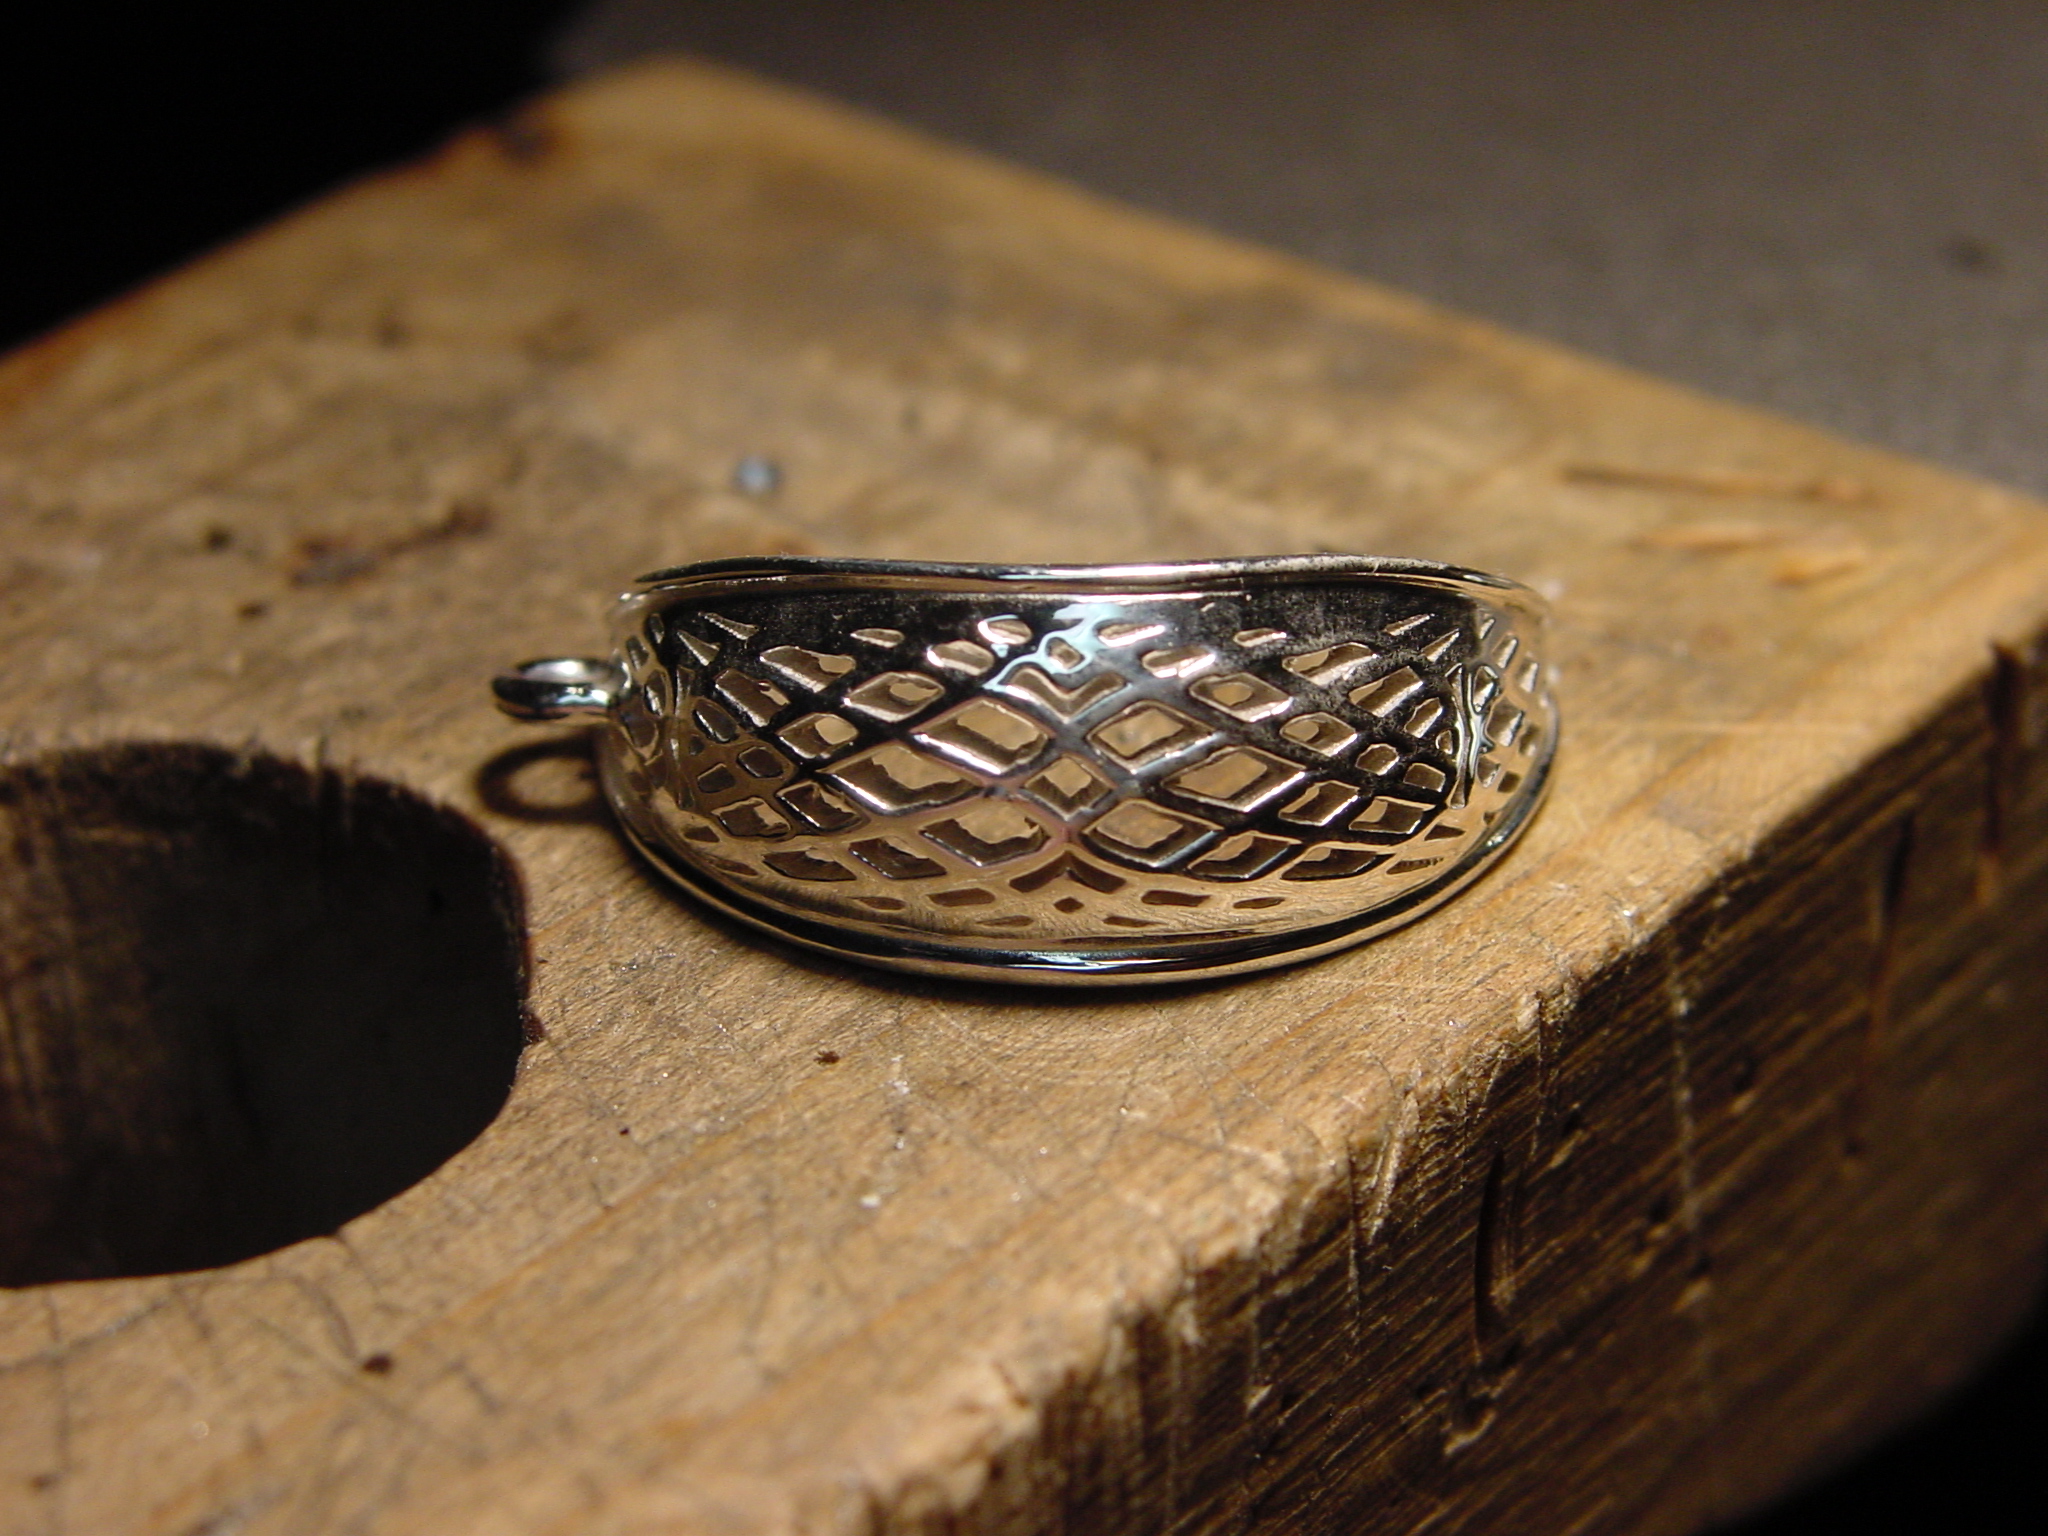
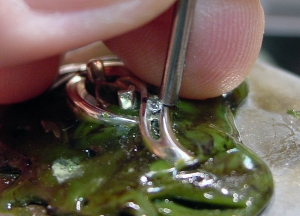
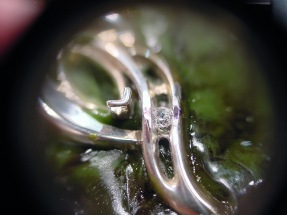
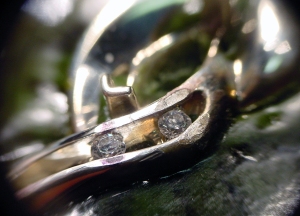
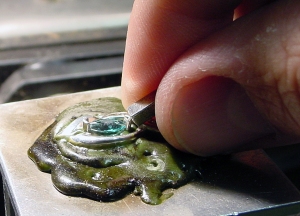
Next I mark the center of the channel by measuring the distance from each end and making a light mark to help line up the first stone. I am going to set 5 stones in this piece, so the center of the channel will be where the first stone will be set. I am setting 2mm stones here, and will cut the first stone seat with a 1.4mm 45 Degree Hart Bur. Make your first cut into the channel wall, leaving a little distance from the top of the channel and the cut. Make a cut into the opposite channel wall at the same height as the first, just not as deep. Start slowly and constantly try the stone in the channel until the stone slides into the deeper of the 2 cuts, and “Almost” drops into the opposite channel cut, then add a little pressure, usually with a finger nail, until it “snaps” into the stone seat.

Channel Setting (3) Channel Setting (4)

Channel Setting (5) Channel Setting (6)

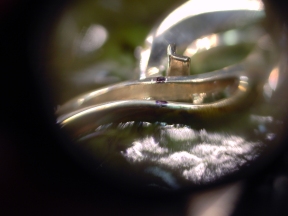
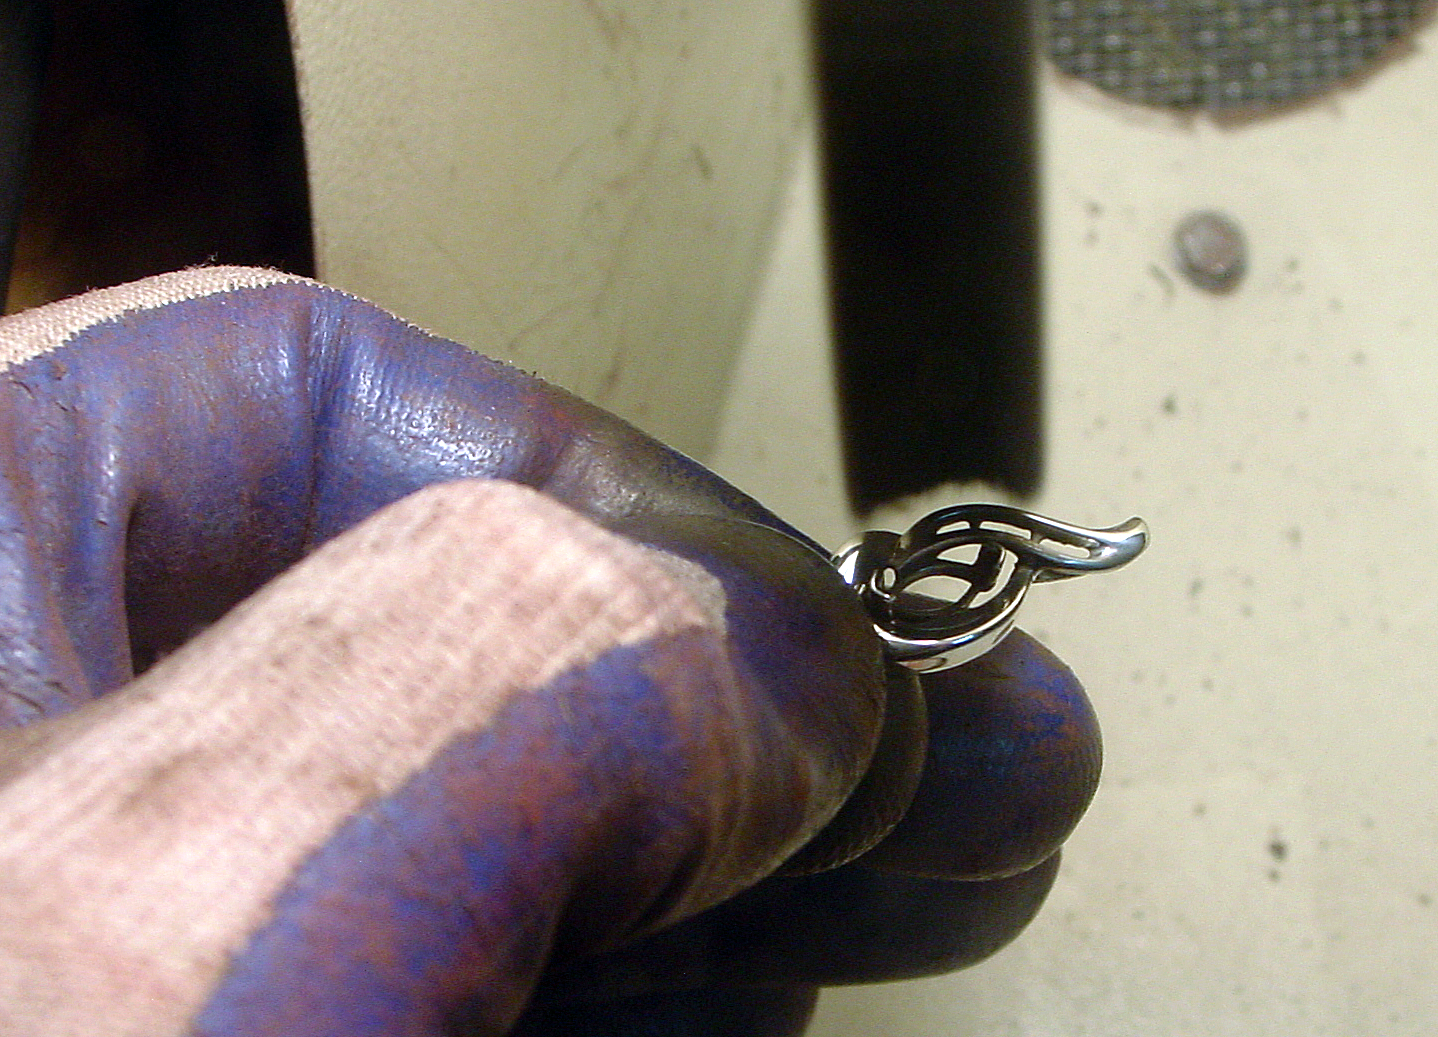
Once the stone is in the stone seat that has been cut into the channel walls, I gently tap the channel top of the channel down to add pressure on the stone from both sides. I have made my own tool for doing this by taking an old bur and cutting off the tapered part. I grind it flat with the slightest dome to it, and finish the end with 400 sand paper so it has less of a tenancy to slip off the channel when I am tapping. Be Very Careful, especially on silver, the channels will move easily and you do not want to break the stone. Tap Lightly!

Channel Setting (7a) Channel Setting (7b)

Channel Setting (7c) Channel Setting (8)

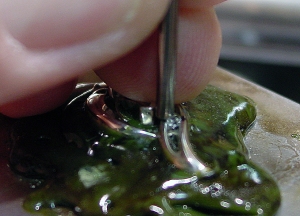
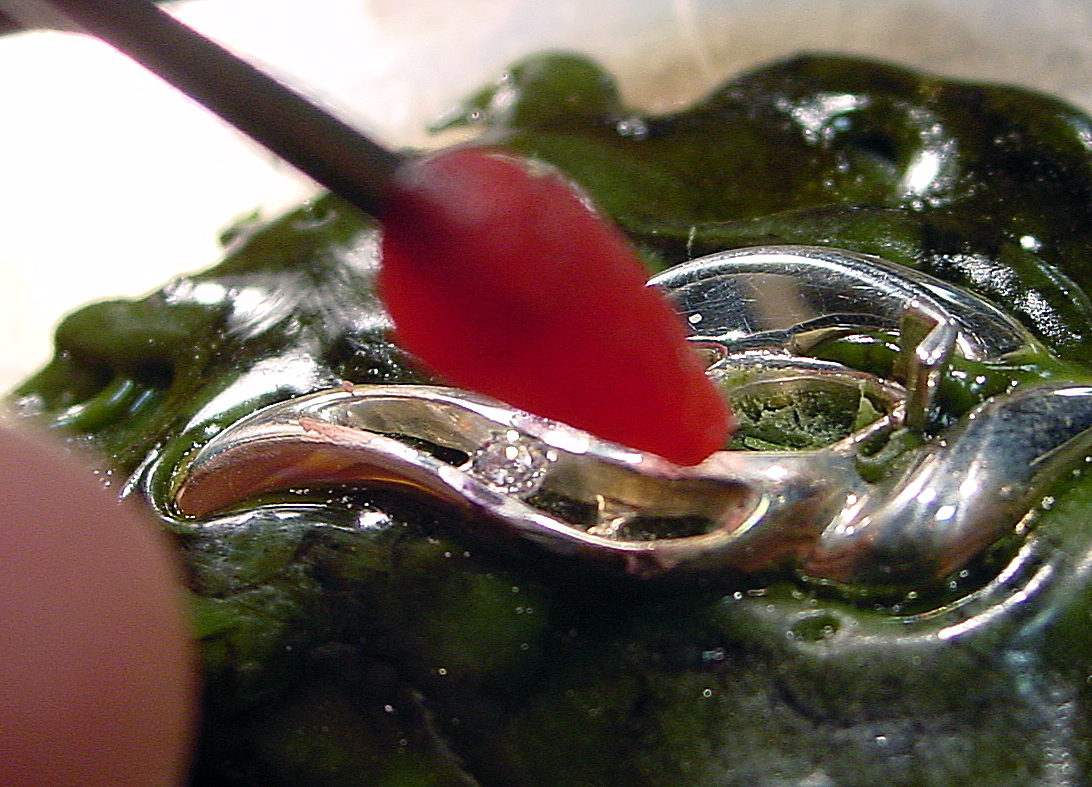
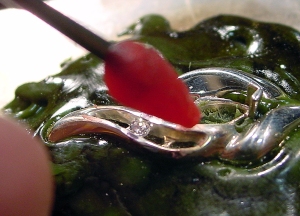
Now that the first stone is set, I will move to the end stone, I rub a little soft red wax on the top of the channel, place the stones on the wax to make sure I am giving myself enough room to fit all the stones in the space provided, and mark the channel where I want the end stone to be set. I repeat the steps I did for the center stone.

Channel Setting (10) Channel Setting (11)

Channel Setting (12) Channel Setting (14)

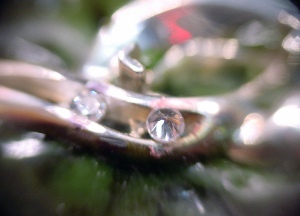
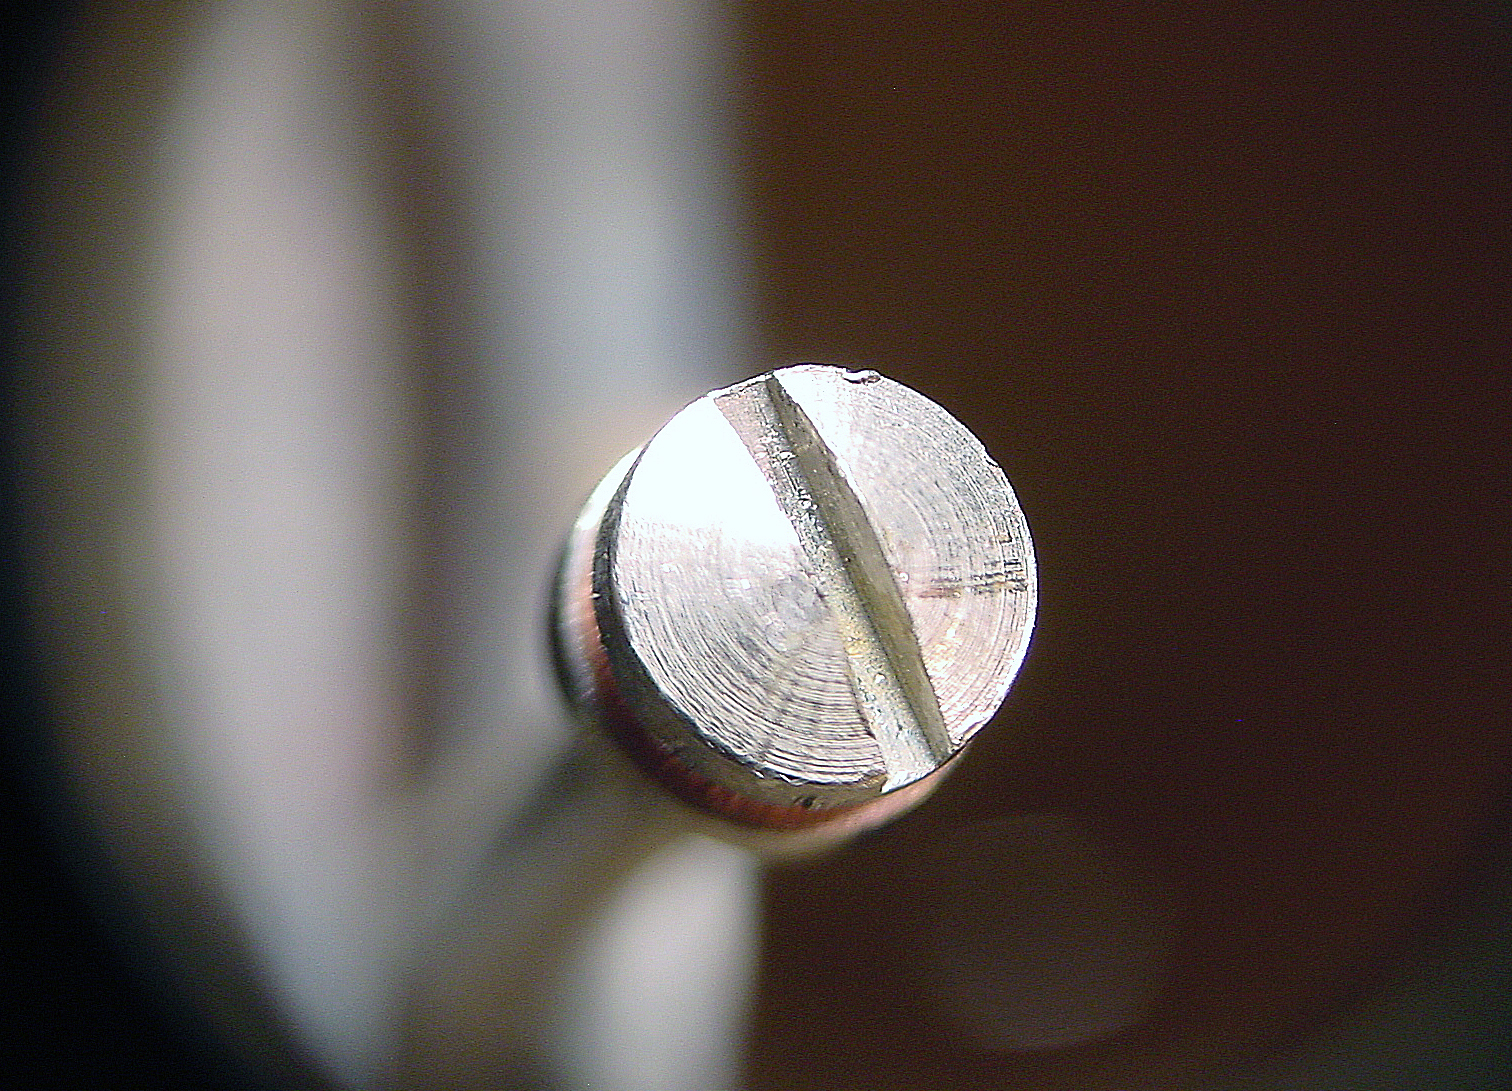
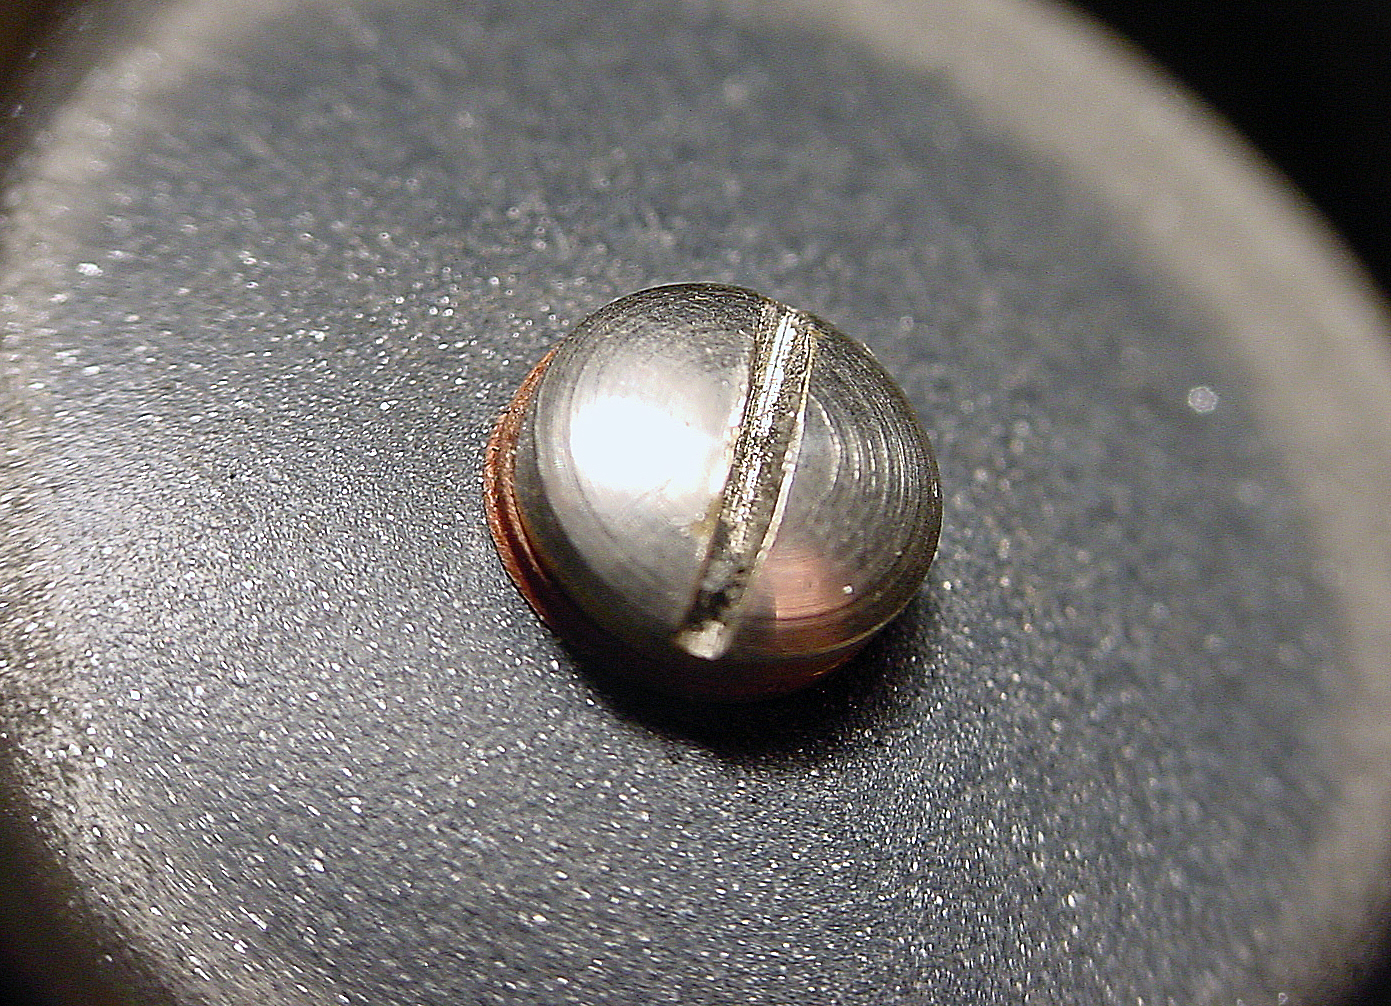
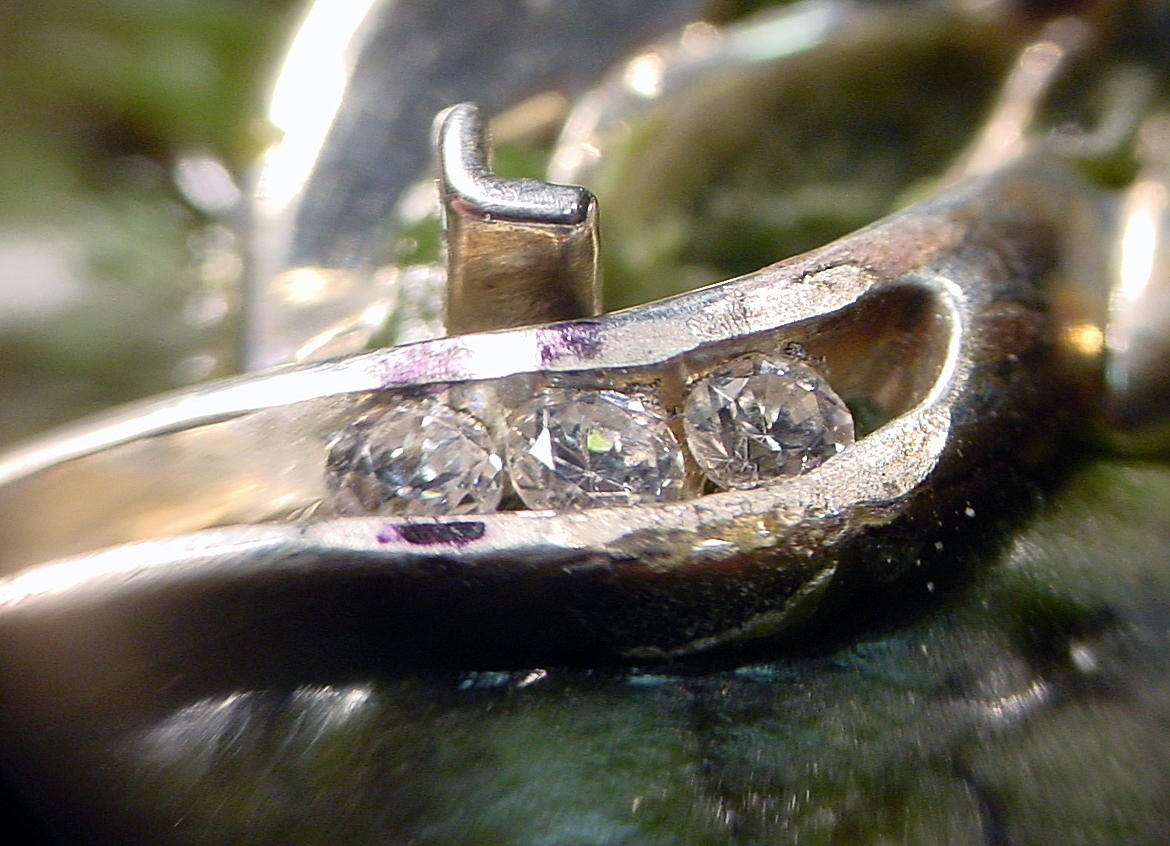
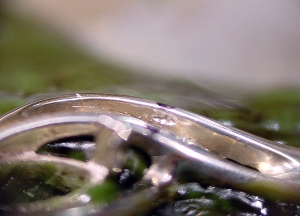
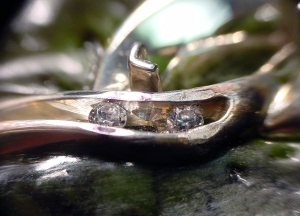
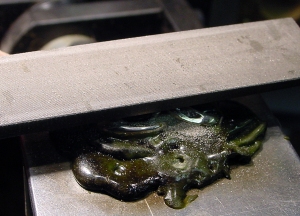
Next I set the middle stone in between the 2 stones I set already and repeat the same process as the other 2 stones. Once the first 3 stones are set, I move to the other side and repeat the process I did for the first 3 stones and set the last 2 stones. Once all 5 stones are set and held in place, I sometimes go over the whole channel with my Hammer Hand Piece to make sure all stones are secure and to blend the top of the channel. This is more important on harder metals like gold or white gold, or even thick channels in silver with bigger stones. I next smooth the tops of the channels with a Rubber Wheel to blend the channel rails and prepare for polishing.

Channel Setting (15) Channel Setting (16)

Channel Setting (17) Channel Setting (18)

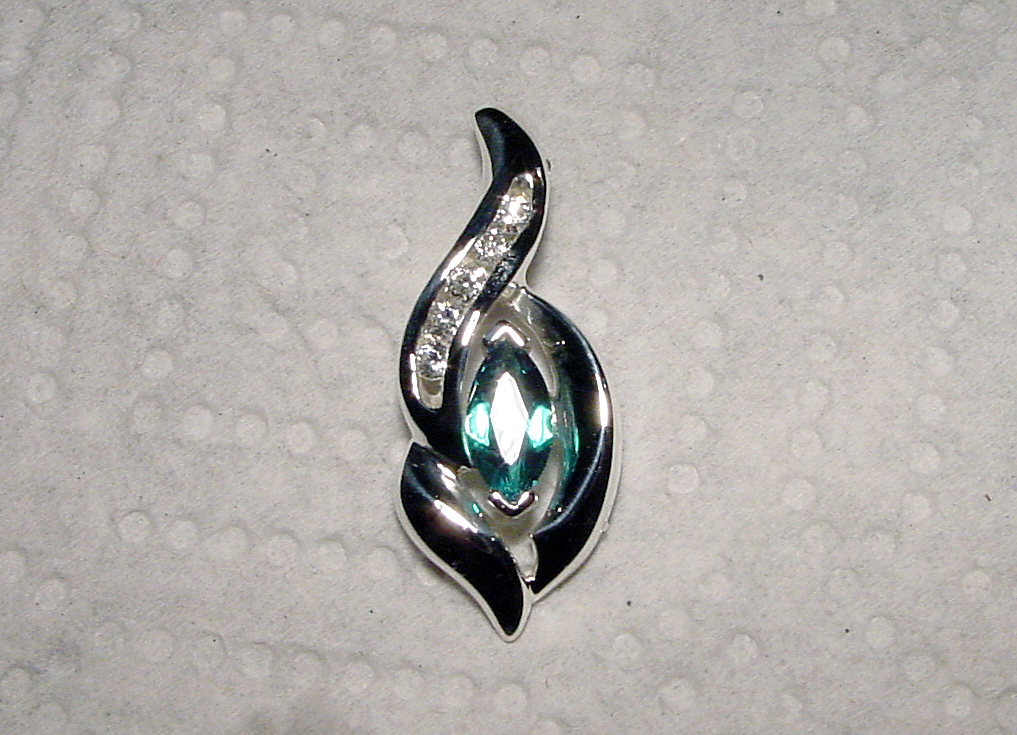
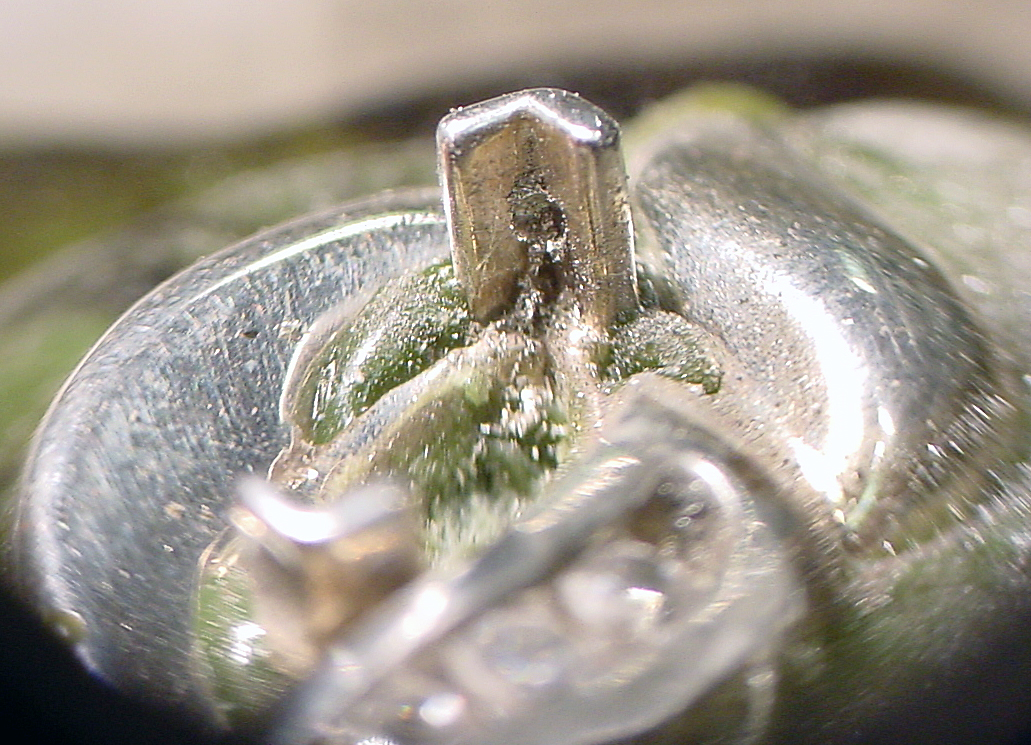
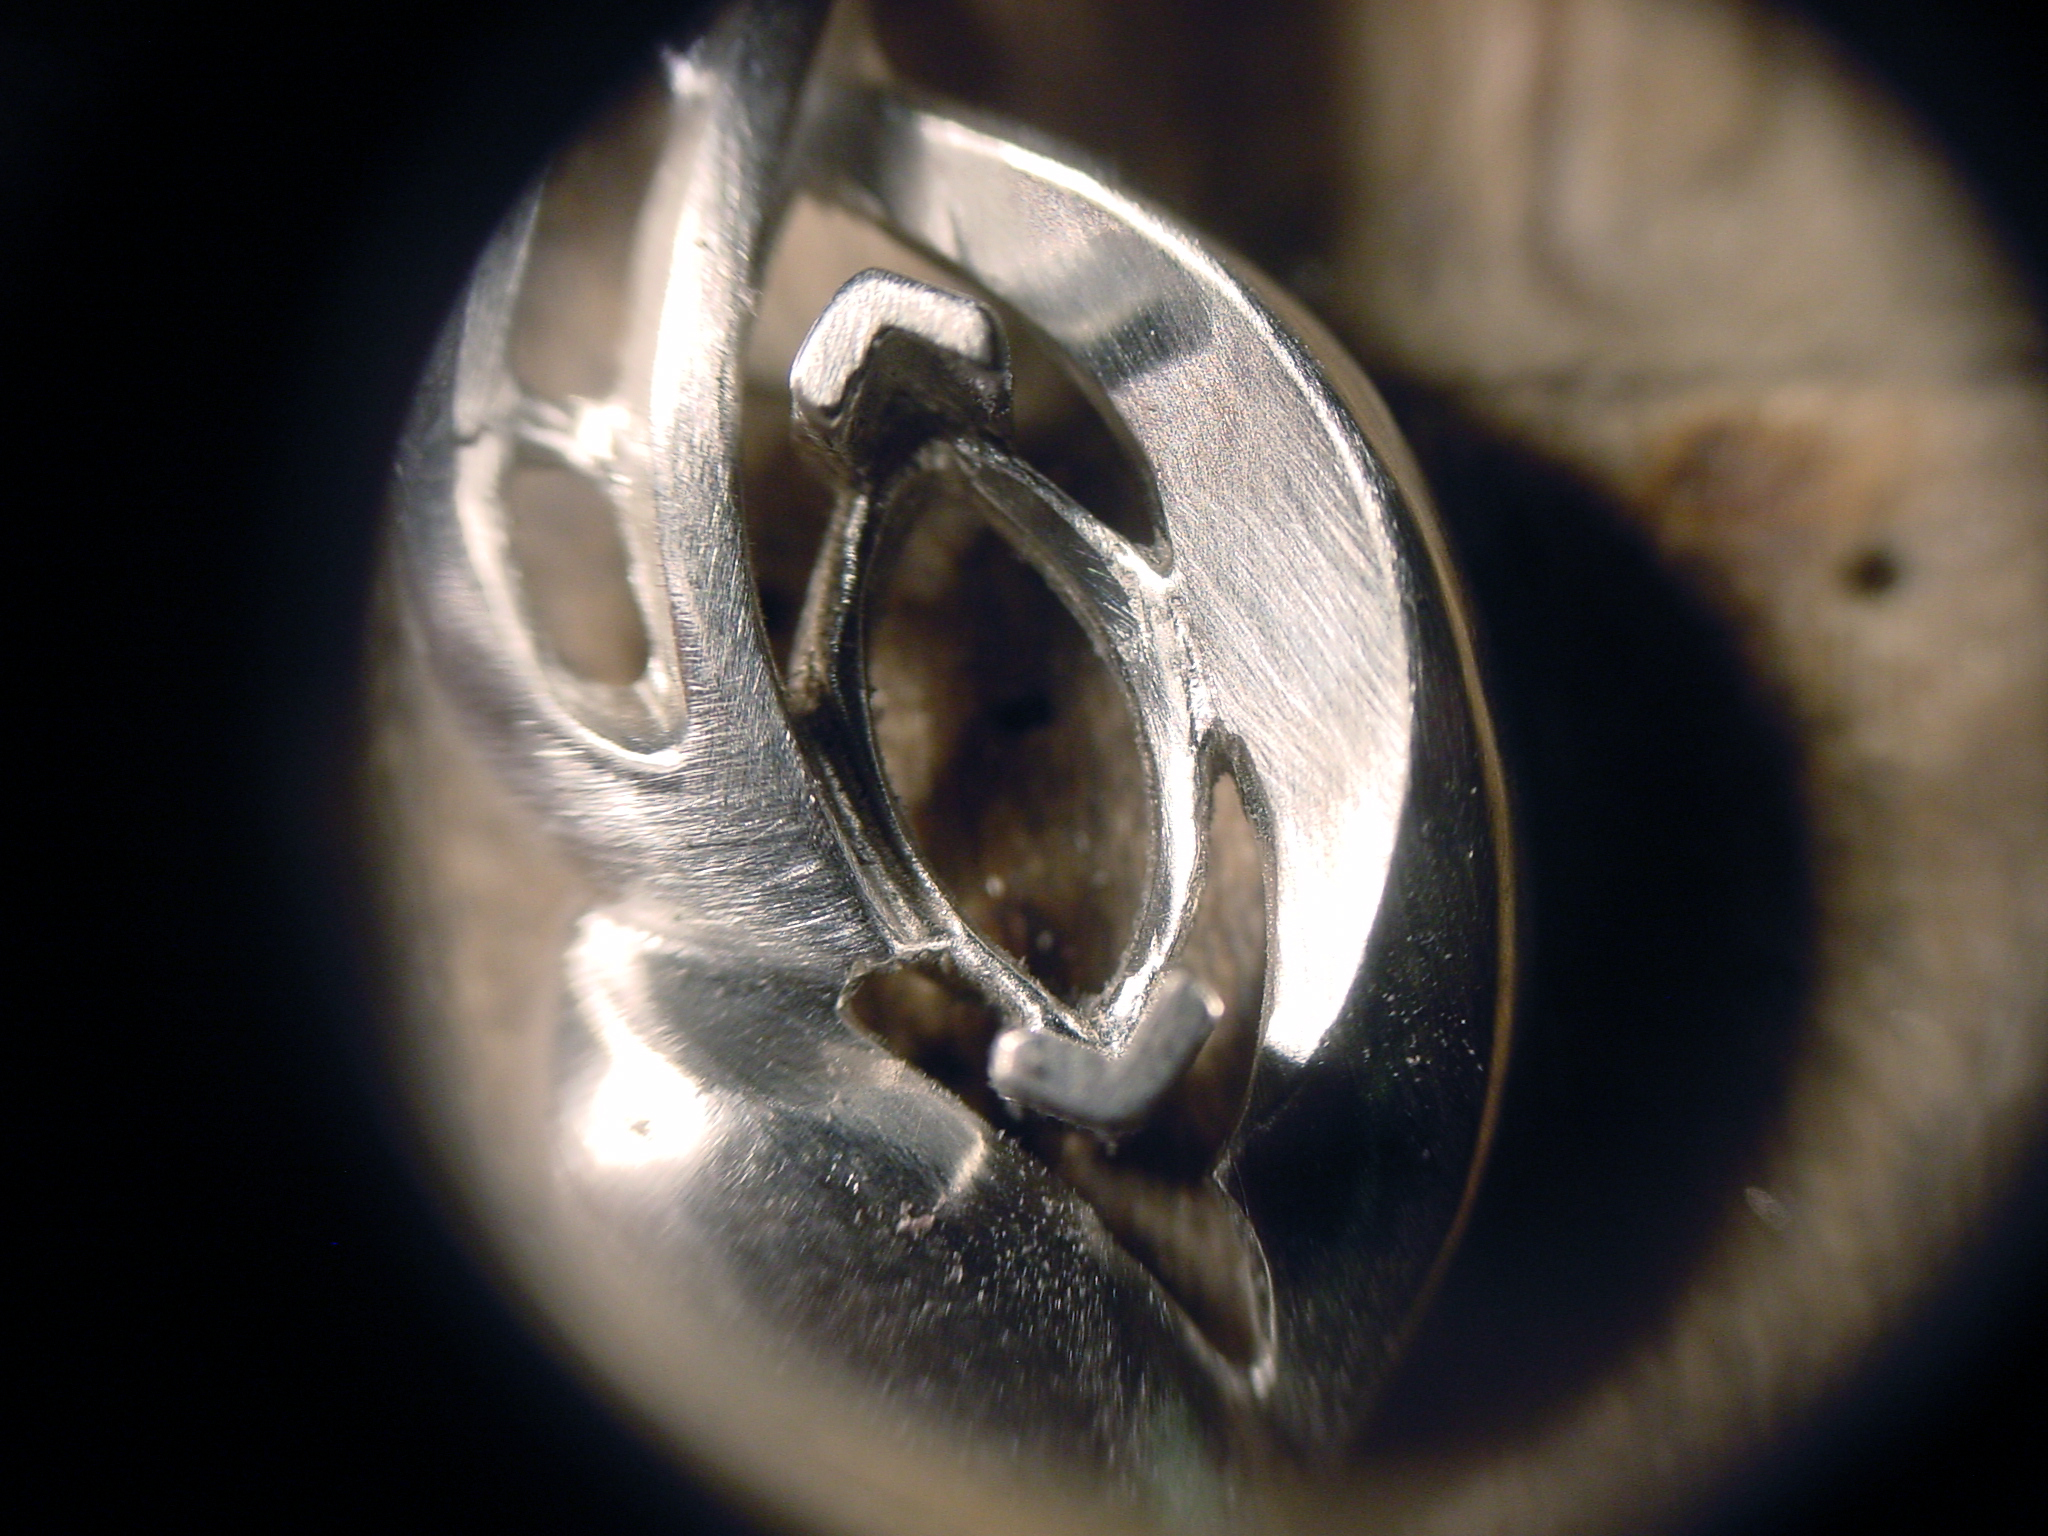
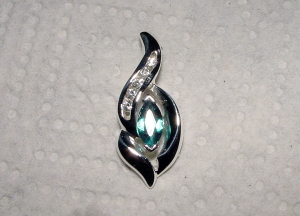
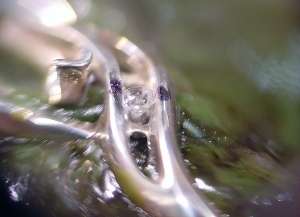
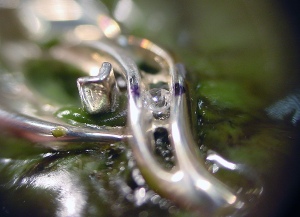
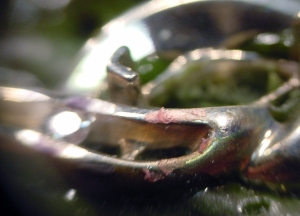
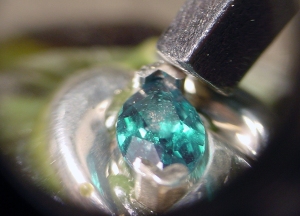
Lastly, I set the Chatham Emerald Marquise stone. I first mark how high I want the stone to set and I use a 0.8mm Ball Bur to drill a small divot in the center of the bezel. I do this so there is no pressure on the point of the stone, this is the most fragile part of the stone and too much pressure here will chip the stone. I cut seats into the bezel using either a ball bur, hart bur or a cylinder bur. in this case, I used the same ball bur I used to create the divot. I place the stone in the seat, and press the bezels towards the stone with a Flat End Prong Pusher, until the stone is held in place.

Channel Setting (19) Channel Setting (20)

Channel Setting (22) Channel Setting (23)

Channel Setting (24)

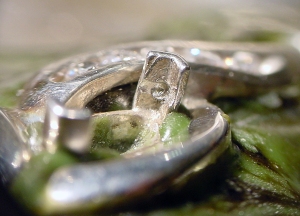
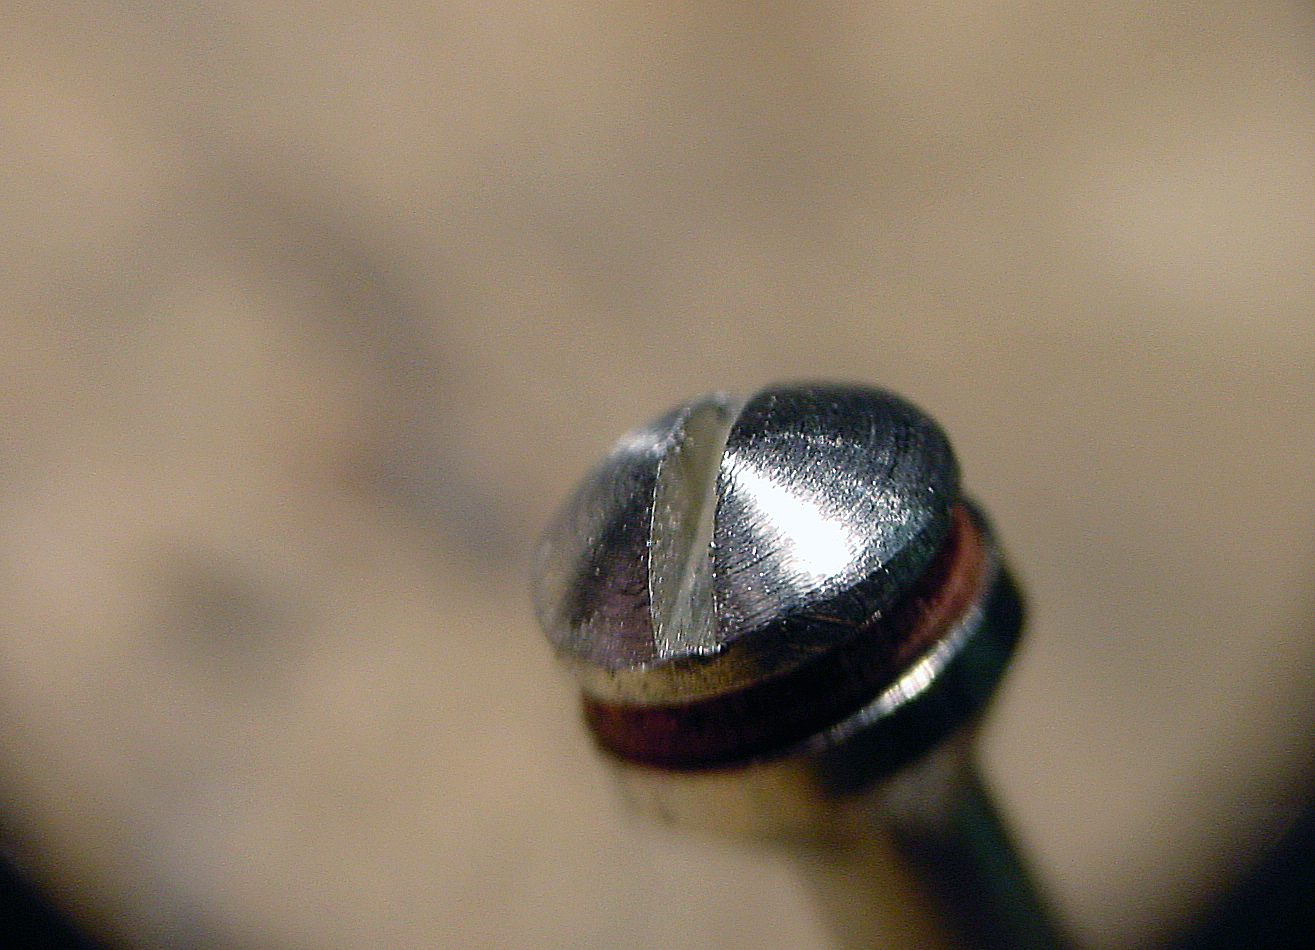
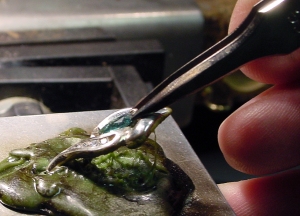
I filed the bezels down to the level I want, using a #4 Flat Hand File, and then press the bezels towards the stone until the stone is tight and does not move in the setting.

Channel Setting (26) Channel Setting (25)

Channel Setting (27)

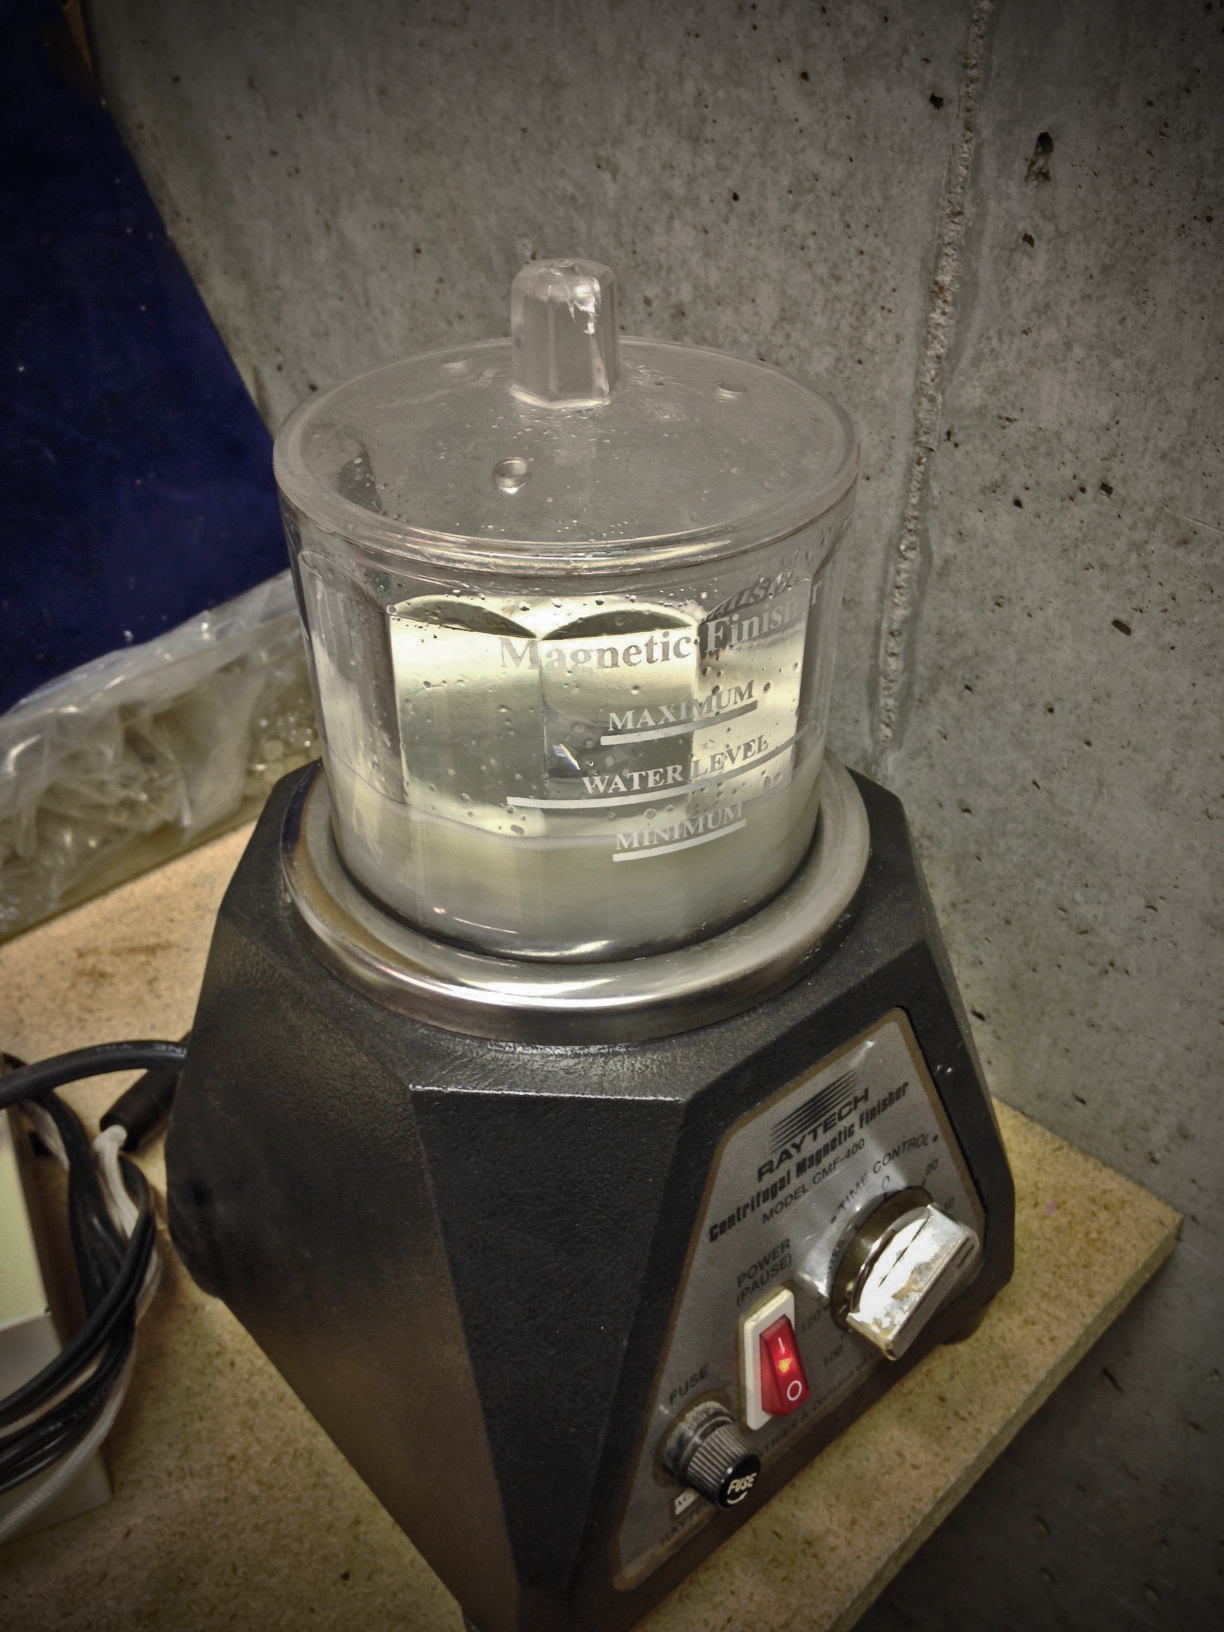
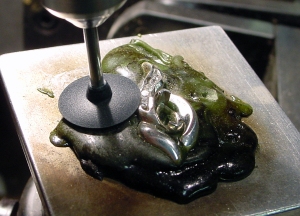
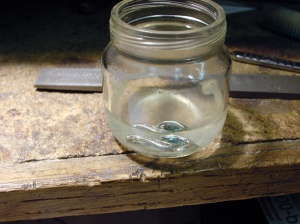
Lastly I remove the pendant from the dop wax, with my torch I carefully add heat while pulling on the pendant until it releases. I place the pendant in a small jar of Denatured Alcohol and place the jar in my Ultrasonic Cleaner to speed up the wax removal process.

Channel Setting (28) Channel Setting (29)

Channel Setting (31)

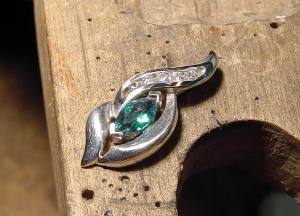
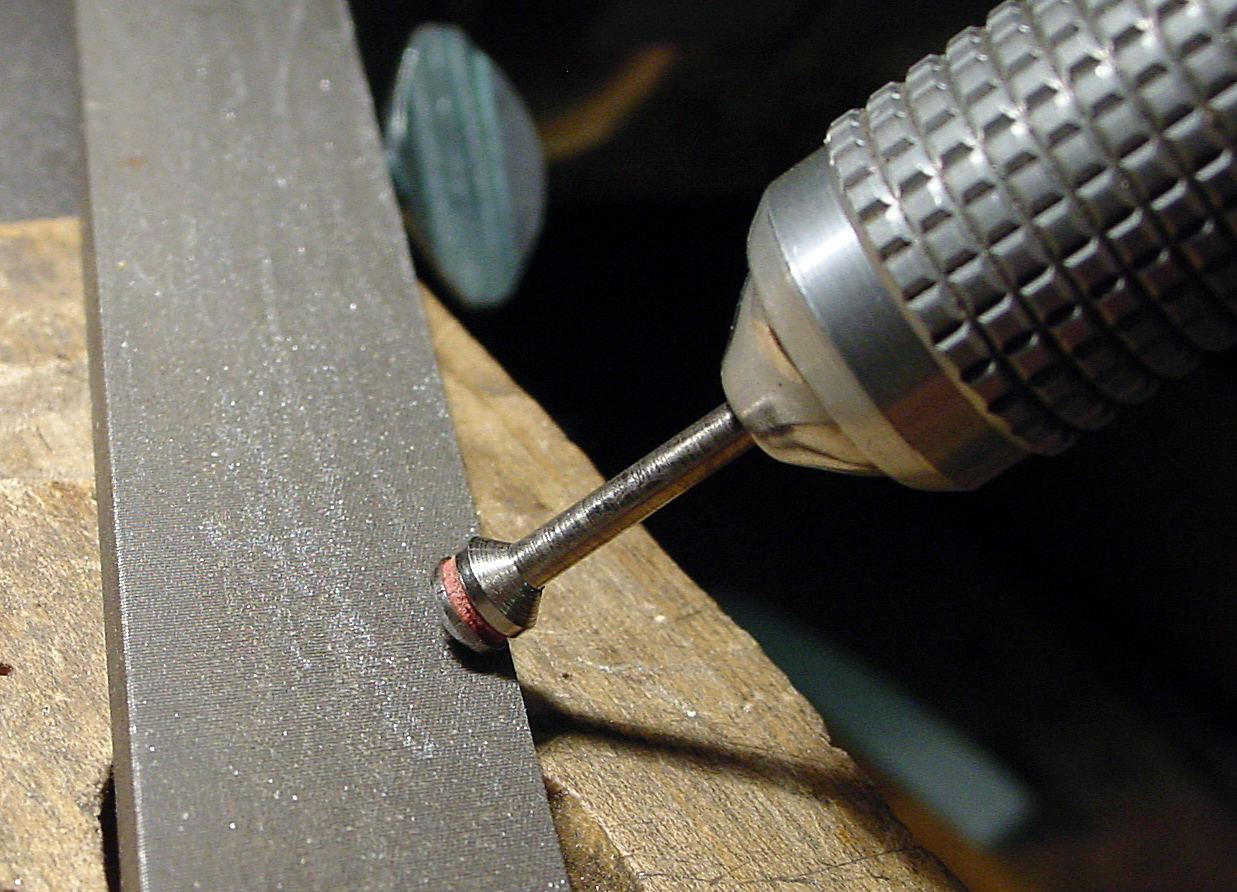
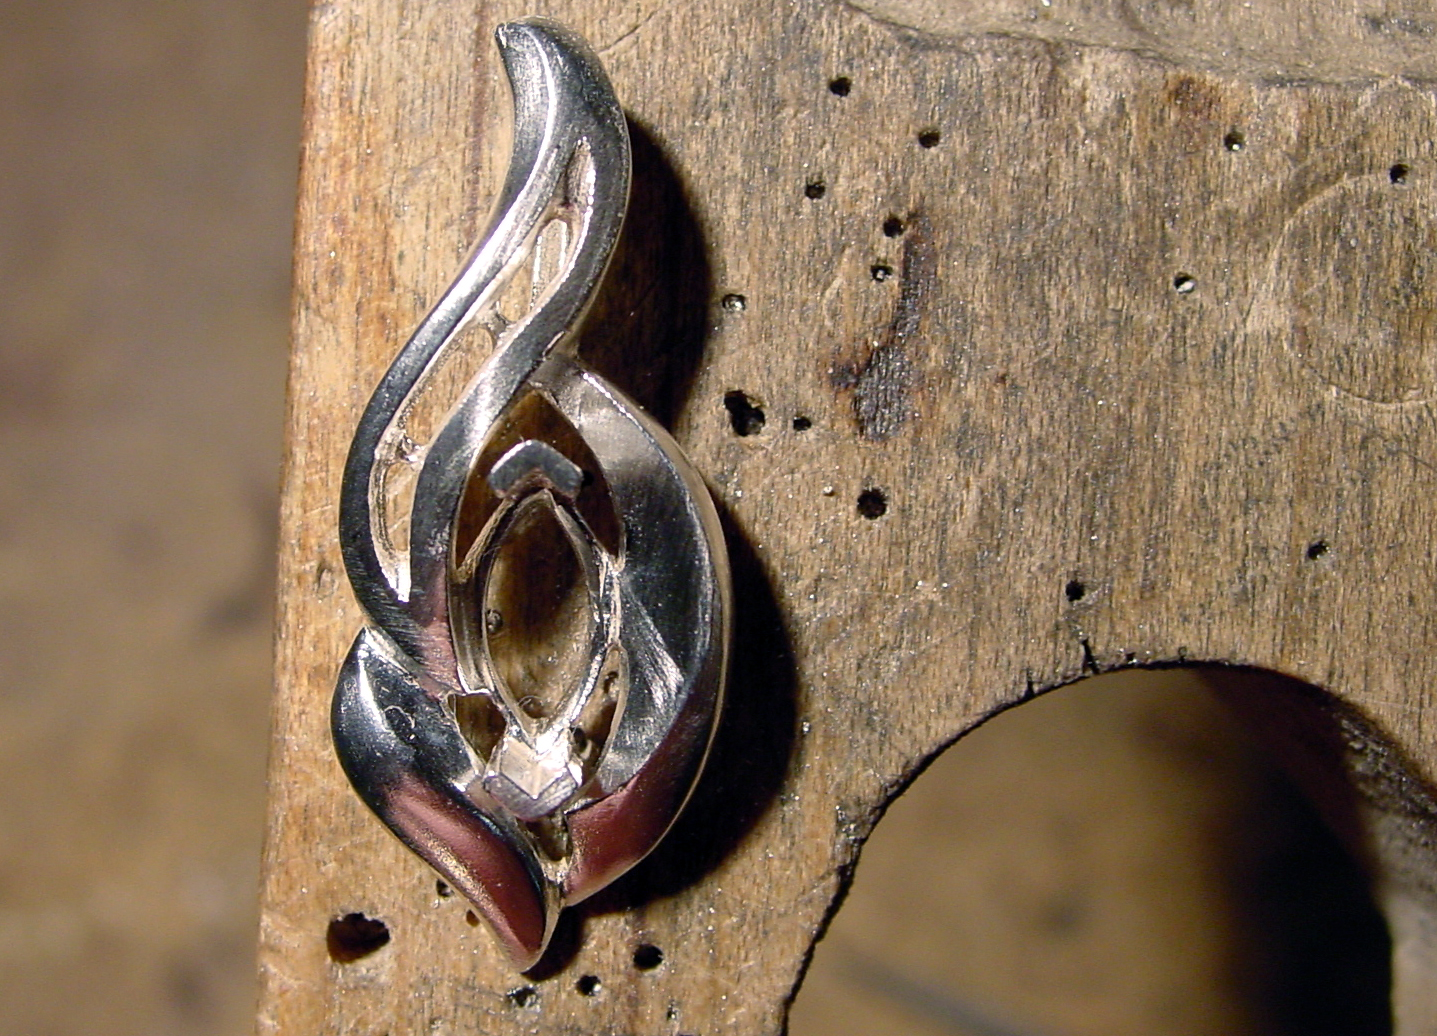
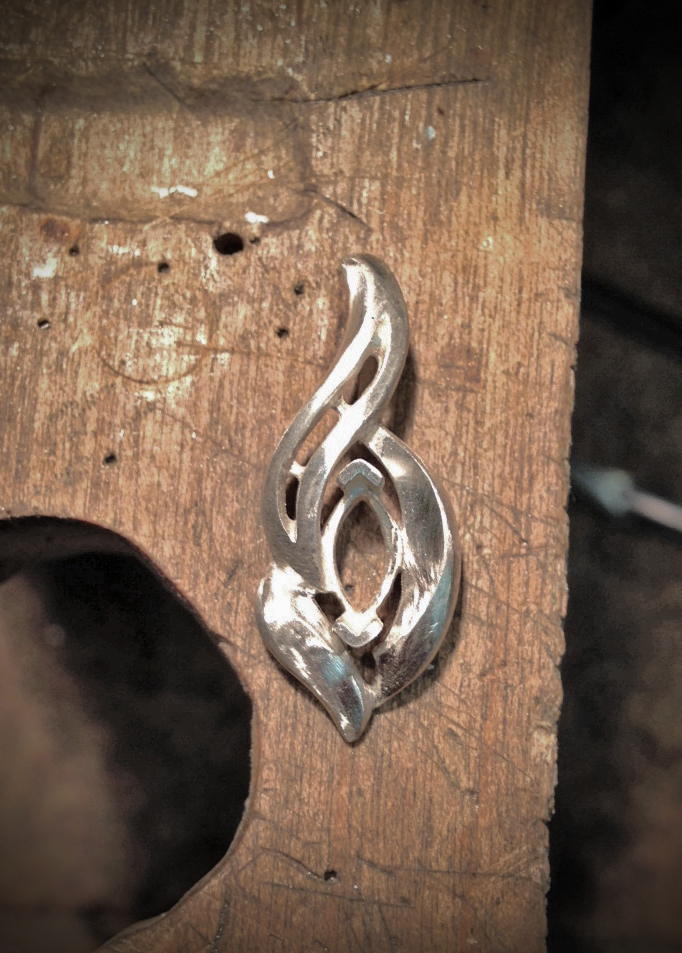
Lastly I touch up the channels a bit with a rubber wheel and 600 sandpaper on a small split mandrel, and shine up on a polishing wheel with Red Rouge.

Channel Setting (33)

There you have it, a quick lesson on channel setting, bezel setting, polishing, and stone layout all in one project.

I hope this inspires you to do something great!

Until next time.

Doug

Day 28 Pre-polishing Getting Ready to Set Stones

MQ Pendant-Header

This pendant is coming along nicely. I pulled it out of the Magnetic Tumbler today and it was nice and shiny in all the places I couldn’t get to with wheels and brushes, especially around the bezels and the back. I have the stones picked out (Lab Created Chatham Emerald) and diamonds for the channel. We will tackle the settings tomorrow, but for today, let’s get this baby shiny!

Now, If you ask 10 polishers how to go about polishing a piece of jewelry, you will probably get 11 answers. Different jewelers use different compounds, but there IS a progression to follow, and every step you do, you are trying to make the scratches and blemishes lighter and lighter each time, and finish with a polishing rouge that will shine amazing, so I will show you one way.

MQ Pendant-2 (1)

Even though it is shiny out of the Magnetic Tumbler, there are still small scratches  and imperfections that need to be addressed. The first thing I do is go after it with a 3M JoolTool Brush. (Red) This brush will remove some of the scratches and burnish marks from the tumbling. These brushes also require no polishing compound, they are impregnated with different grits.

MQ Pendant-2 (2) MQ Pendant-2 (3)

Next I use my Foredom and load a Stiff End Brush with Graystar Polishing Compound. I add a couple of drops of Mineral Oil to the Compound. This will create a little “slurry” and polishes better, and also keeps the debris from getting everywhere. Sometimes I use Oil Based Valve Grinding Compound on an end brush, it is more aggressive, but works good on silver to remove deeper scratches from those hard to get places. You can also get this at an automotive supply store.

MQ Pendant-2 (4) MQ Pendant-2 (5)

MQ Pendant-2 (6)

Now I will go over the pendant with a Soft Hair Wheel Brush (or Medium) loaded with Bobbing Compound, a tripoli compound that works quick on silver. I use a soft brush here since there are more rounded and “organic” shapes. If there were more prongs or sharp edges, I would use a Stiff Brush, which gets in between prongs better.

MQ Pendant-2 (7) MQ Pendant-2 (8)

MQ Pendant-2 (9)

Lastly, I take the pendant to my polishing machine, again I use Graystar Compound, but on the machine, it rotates much faster, therefore polishes out the remainder of the scratches. Remember to have specific wheels and brushes that are allocated for specific compounds and never mix them. You will have a better polishing experience if you do.

MQ Pendant-2 (10) MQ Pendant-2 (11)

MQ Pendant-2 (12)

Thanks again for stopping by and following along, I value each of you and your feedback. Check back tomorrow and we will finish this project.

Have a Great Day!

Doug

Day 27 Pendant Clean-up and Stone Setting

Well, I dug up another project to spend some time on. It is a raw sterling silver casting and over the next few days I will go over how I clean it up, do some prep work to it, go over some polishing with compound types, brushes and wheels, and do some channel and bezel setting. With all that said, lets dive in.

Mq Channel Pendant (0)

First I have my raw casting. With a raw casting, the surface is usually a little rough. Even if the wax is cleaned up very well, the “skin” on the casting has the surface texture of the investment used. Although it is “smooth”, it is “gritty” and the color is white.

Mq Channel Pendant (1)

This casting had 2 sprues/gates attached to the bottom. They have been clipped and there is a little excess left. For clipping off the casting tree, you want a good set of Strong Cutters. You don’t want to clip the piece too close because it will mar the piece and possibly distort it from the cutting tool. I file the excess off with 2 files, the first is a #4 Barrette Needle File and I use it on the “convex” shape of the design. I also use a #4 Crossing Needle File for the other side since it has a “concave” surface.

Mq Channel Pendant (2) Mq Channel Pendant (3)

I gently file the surface with both files to remove the casting “skin” or the white surface. on this piece, the inside edge next to the marquise setting is a little rough. I have a Surgical Blade that I have modified the tip to get into tight areas like this. I mount it on my Scalpel Handle and “shave the inside edge until it is smooth. This blade can also be polished on a piece of paper with Yellow Rouge on it like the examples in the blog entries of Day 3 and Day 8.

Mq Channel Pendant (4) Mq Channel Pendant (5)

I have also made miniature “Split Mandrels“, out of a piece of brass rod, sanded down to 3/32′ (2.35mm), the same thickness as most burs. I carefully cut a slit down the middle to hold the sandpaper about 10mm long. I can load this with a variety of sandpaper grits, but I usually use 320, 400, and 600. I have many of these laying around in different shapes and sizes.

Mq Channel Pendant (7) Mq Channel Pendant (6)

I also go over areas with a Fine Aluminum Oxide Snap On Disc. I have many different sizes of these as well. I cut and sand these so that when they are rotating in your Foredom, they do not vibrate. This allows you to run the edge of the sandpaper along an edge of the jewelry without marking it.

Mq Channel Pendant (8) Mq Channel Pendant (9)

Go over the whole piece and get any scratches or defects cleaned up.

Mq Channel Pendant (10)

Now I place the piece in a Magnetic Pin Tumbler to polish and burnish all the areas that are hard to get to. I set it for approx 30 minutes.

Mq Channel Pendant (11)

That is it for today, tomorrow we will pull it out of the tumbler and go after it with rubber wheels, brushes, and different polishing compounds.

Enjoy your day, now go make something wonderful!

Doug

Day 26 Using Polishing Brushes

Polishing is something that everyone that works on jewelry will have to do, and there are a few tools that will make your job a lot easier. Today we will look specifically at polishing brushes, soft, medium, and stiff brushes and when to use them.

First let’s look at applications for the brushes. You can get the either Mounted on a mandrel or Unmounted. I prefer the unmounted ones, because I use them on a Screw Mandrel or on a Polishing Machine Mandrel. They both work about the same, you can try them both, but I like the unmounted ones better, they are easier to store, (less bulky) and quicker to load and unload on a mandrel.

Med Mounted

Let’s look at how each one works:

Soft Brushes: Work good for rounded surfaces, areas with grooves, and areas where “crispness” is not an issue. I like to use these brushes with an aggressive compound on “organic” shapes to take out scratches and blend curves. If you think about how this brush works, you are actually using the side of the bristle to polish because when you apply it to the metal, it is soft and the bristles fold over easily. You can also use a Red Rouge Compound on these brushes and softly go over areas to bring back a bright shine.

Soft

Stiff Brushes: Work good for getting inside tight areas, like inside of gallery work and in between prongs on settings. These brushes work good at getting into sharp corners and inside edges. Use a medium compound on this wheel like a White Diamond Tripoli Compound or Graystar Compound. If you think about how these brushes work, the bristles are stiff and the ends of the bristles work better because they do not fold over as easy.

Stiff

Medium Brushes: Work good for all around areas. I like these for most applications. This brush reacts to pressure much better, if you need the soft blending action of a soft brush, use an aggressive compound and add more pressure. Add less pressure and it will get into tight areas like in between prongs and corners. Keep a couple of these around with different compounds on them, Gray and Red for pre-polishing and finishing. Do not mix compounds.

Med

I am sorry I didn’t get any good “at the bench” photos, but I hope you can understand. I will talk more on polishing at a later date.

Now go make something shiny!!!

Doug

Day 25 Casting Defects Pits and Porosity

If you haven’t casted your own jewelry, or sent waxes (or CAD Files) off to someone to cast them for you, here is a tip and a quick check to save you cleanup time in the metal. There is nothing more frustration than finishing a casted piece and finding pits and porosity that you have to either solder to fill pits, or have them laser-filled. There are many types of porosity, from bad sprue/gate design or placement, shrinkage porosity, gas porosity, etc. but the easiest to avoid we will cover today. (A sprue or gate is the way the metal gets into the piece of jewelry during casting.)

Porosity Header

The easiest way to avoid casting defects is to pay attention to the sprueing or gating of your piece in wax or the model. Sprueing/Gating can be a complicated subject, and can take a long time to get a grasp on the technical end of it, but I will give you a couple of quick tips to get you understanding why it is important.

First, if you are adding a sprue to a piece that you are molding, or a wax you are casting, add the sprue to the thickest part of the piece and use a sprue that, as a rule of thumb, is 1.5 times thicker the area you are adding the sprue to. (For example, if you are adding a sprue to a ring, and the ring has a shank that is 2mm thick and 4mm wide, use a sprue that is approx. 3mm thick (2mm x 1.5)

Now for the easiest way to avoid a defect in the casting. Pay special attention to the joint, or union of the sprue, and the piece of jewelry. If there is not a good complete union, like a pit or a sharp edge, in the solder or wax joint, this will cause pits in your castings. Let me show you how:

Bad Wax 01 Bad tree

Bad gate 02 Bad gate 01

In the casting process, the wax is surrounded by investment, similar to Plaster of Paris, for the “burnout” or elimination of the wax. If there is a divot, pit, or sharp edge in either the union of either the sprue-to-jewelry, or the piece to the casting base, (tree) then during the casting process, when there is molten metal flowing through the casting flask, the metal flowing at a high speed and pressure will hit the little investment defect and break it off, and the piece of investment will float around in the metal and end up as a void or defect in the metal, resulting in a pit.

porosity 02 porosity 01

A little care and attention to the union of the wax to the tree, or sprue to the wax will prevent these kind of defects in your castings. I know this is kind of complicated, but I hope I explained it in a way that makes it understandable. I also hope the images help to explain. If it is still unclear, go ahead and post a comment and I will try to answer your questions.

Also if you have a subject you would like me to cover, comment here or on Facebook (JewelryMonk).

Take Care and have a great day! Now go make something shiny!

Doug

Day 24 Aluminum Sanding Sticks

Making tools again today. To get a nice flat surface or a clean edge, a sanding stick works really well. I have used wooden sanding sticks and plastic sanding sticks before, but truthfully, I like a good aluminum one because it just feels a little more substantial in my hand, it remains flat and true, doesn’t bend like a plastic one, and it doesn’t “grove” like wooden ones can. Today I will show you how to make your own aluminum sanding sticks that will last you forever.

Sanding Sticks Header

All you will need is a trip to the hardware store, (or online) buy Aluminum Flat Bar that is 1/8″ x 3/4″ in a length that will be long enough to make as many sticks as you want. I have 2 of them for 2 different grits of sandpaper. The sticks are 12″ long (1 foot). You will also want to buy some sheets of Wetordry Sandpaper. I use 400 Grit and 600 Grit, but you can use the grit you want. I have used 320 grit and 1000 grit as well, but found out I didn’t use them very much. The 320 grit was similar to my #4 Flat Hand File, and the 1000 was a bit too fine, and I found I could polish after the 600 grit sandpaper.

Sanding Stick (1)

Place the sandpaper face down and place the aluminum stick along the edge and “score” or scratch a line along the edge, just hard enough to leave a mark in the paper but not all the way through the paper. After you score the line, bend the paper over to make the scored line nice and sharp. Fold over and continue. You could do this if you like your edges sharp, or you could just wrap the sandpaper around the aluminum stick. I make about 3 complete wraps, then trim off the excess with a Surgical Blade in a  Scalpel Handle.

Sanding Stick (2) Sanding Stick (3)

Sanding Stick (4)

After I trim the sandpaper, I wrap the end with Masking Tape to hold it in place and write the number of the sandpaper on the tape, so I can identify it quickly. (4 = 400, 6 = 600)

Sanding Stick (5)

Again, the reason I like the aluminum is because it is light weight, inexpensive to make, long-lasting, won’t mark, grove or bend, and substantial feeling in my hand.

Sanding Stick (6) Sanding Stick (7)

Sanding Stick (8)

Thanks for stopping by today, I hope my tool “Geekiness” is not boring you.

Enjoy your day and go make something outrageously beautiful!

Doug

Day 23 Contrasting Jewelry Textures (part 2)

Day 23…. I mentioned yesterday that I really like contrasting textures, and I do. For some reason, contrasts really appeal to me, whether it is textures, colors, metals,….. even in nature I am attracted to things that have a strong contrasting edge. I showed you yesterday how I use my Electric Vibratory Engraver. It works wonderful at giving a matte or satin finish, and is quick. A good contrasting finish is sometimes better than a good shiny polish.

Texturing (2)

Today I will add a twist to the Electric Vibratory Engraver by adding a diamond bit. On Day 13 of this journey, I showed you how to bezel set or tube set a stone and now we will do something similar, just with a twist, we will be setting it upside down. What WHAT??? Yes, upside down.

I use a piece of brass rod (2.35 mm), I file it flat and drill a pilot hole in the end with a bit about 1.4mm. In this instance I am using a stone that is 1.75mm. You can use different sized stones if you like, this is just one I had that was chipped on the girdle. (a good use for chipped stones) Any size diamond will work as long as the “culet” or bottom point of the stone is in good shape.

Texturing (10) Texturing (11)

Texturing (12)

Use a 1.70mm Hart Bur to cut the seat for the stone, and use a Cylinder Bur (1.40mm or so) to clean the bezel walls and flatten the bottom of the seat so it makes good flat contact with the stone after it is set upside down. Place the stone in the setting, top side down and make sure that the top of the bezel is just barely over the girdle. You want the stone to be exposed as much as possible, if the bezel is too tall, just file it down a bit. Set the stone by pressing the bezel over with a Flat, Square Prong Pusher.

Texturing (14) Texturing (15)

Texturing (18) Texturing (19)

Now that the stone is set into the brass rod, trim the brass to approximately one inch total length, (trim to how ever you feel comfortable 3/4″ to 1″) use a small flat screw driver to remove the screw that holds the bit that is in the engraver and insert the piece you just made. The new tool is smaller in diameter than the hole it fits into, but once the screw is tightened, it holds firmly.

Now just turn on the engraver and rub over the area that you want textured. I try to keep the back and forth motion going in the same direction to make the look of the texture uniform. Be careful though since the movement of the engraver is an up and down motion, (like a small jackhammer) and if you touch an area that you do not want textured, it will leave small little divots or pits. The texture from the diamond bit tool is much shinier and brighter than the steel tool. It will reflect the light like a diamond wheeled surface and catch the light and look like itty bitty diamonds are set in the surface of the metal. The images I took do not do justice to the actual look of the piece.

Texturing (24)

Texturing (2) Texturing Finished

Thanks for stopping by. I hope to see some of your contrasting textures.

Until Tomorrow……

Doug

Day 22 Jewelry Texturing (part 1)

Day 22…. I know, I know, I am a little late posting this one, but I got it under the wire, still on schedule with this crazy 90 in a row kick-off to the JewelryMonk Blog.  I took a road trip this weekend and didn’t have any lessons in the bag, so I had to “whip one up” when I got home, so let’s get on with it.

One of the things I really enjoy about finishing jewelry is trying different contrasting textures. Sometimes just polishing doesn’t “do it” for me.

Texturing (2)

Today and tomorrow I will cover a very quick and very easy way of getting a good texture. The first thing you will need is an Electric Vibratory Engraver. Luckily these are pretty inexpensive and readily available. These come with a carbide steel engraving point, but truthfully, this is the first thing I replace. I have mentioned before that I reuse and retool many of my burs, and this is exactly what I do here. Even though the carbine bit that comes with the engraver is a lot harder, it is a little big to my liking. I make mine sharper and thinner to get into tight spots without marking the walls of the pieces. I just use a small used up ball bur and sharpen it with a Snap-on Disc. The tip can be sharpened, rounded, polished, flattened, etc. to give you different looks, you will have to experiment with this.

Texturing (4) Texturing (5)

Now just turn it on and rub over the area that you want textured. I try to keep the back and forth motion going in the same direction to make the look of the texture uniform. Be careful though since the movement of the engraver is an up and down motion, (like a small jackhammer) and if you touch an area that you do not want textured, it will leave small little divots or pits.

Texturing (6) Texturing (7)

Texturing (9)

Great look if you like contrasting textures and super easy and quick.

Give it a try. Tomorrow I will demonstrate another tip that is amazing in this tool.

Cheers!

Doug

Day 21 Gemstone that take heat and Ultrasonic

Wow. today marks 3 weeks since I started this 90 day-in-a-row Blogging journey, I hope you are following along and having as much fun as I am. I am traveling today, so here is a little quick info for you to take with you:

Gemstone That Can Take Heat

Gemstones that can generally take heat from soldering and casting in place are: Diamond, Ruby, Sapphire, Garnet, Cubic Zirconia and Various lab grown colored gemstones.

Gemstones that can NOT take heat from soldering and casting in place are: Emerald, Opal, Jade, Amethyst, Topaz, Peridot, Coral, Aquamarine, Tourmaline, Topaz, Pearl, Lapis Lazuli, Turquoise and Onyx as these gemstones may burn, crack or discolor when exposed to high heat.

For soldering or casting in place, gemstones should be high quality, dimensions are accurate, free of flaws and inclusions that can turn milky, frosty or crack when heated.

Ultrasonics and Stones

Ultrasonics and Stones

Thanks for stopping by and coming on this journey with me.

Now go have a Great Day!

Doug